#Throwback: How to Create a Calligraphy Pumpkin
I know it’s not Thursday, but we’re throwing it back anyway! If you’d like to add some scripty flair to your favorite autumn accessory, check out last year’s tutorial on creating calligraphy pumpkins. As a bonus, I’m also including this segment I did with Arizona Midday so you can see the whole process in action. Spooky scripting!
HOW TO CREATE A CALLIGRAPHY PUMPKIN

It probably comes as no great surprise that I write on my pumpkins. I mean, don’t get me wrong - I love to carve pumpkins, too (hello, roasted pumpkin seeds!). But with calligraphy, you can create something super fun, punny or even chic… without pulling pumpkin guts out from under your fingernails. Not cute.
Here’s what you need:
A pumpkin. You can go with a real pumpkin or a craft pumpkin — no matter which you choose, you want to look for a pumpkin that isn’t super bumpy. Pumpkins with very deep ridges will be more difficult to write on — ditto those warty, fairy tale pumpkins. Pretty, yes. Conducive to calligraphy? Not so much.
Paint pens. I used Sakura Pen-Touch paint pens, but you can try whatever you have on hand. Be sure to test on the bottom of the pumpkin first - some paint pens won’t work as well, and it’s better to find that out on an area no one will see. As a side note, a chalk marker will work as well — but don’t use this if you are planning on putting the pumpkins outside as it will run if they get wet.
Pencil or chalk pencil/sharpened chalk (only if you are using a black craft pumpkin).
Ballpoint pen
OPTIONAL: Spray bottle and towel. This will come in handy if you make a mistake. The paint pens I used were immediately permanent, but if you are using a chalk marker or other type of paint pen, you may be able to erase the mistake if you act quickly and get it before it dries.
OPTIONAL: A template. I’ll show you first how to use with a template and then how to go freehand. And psst — you can download the template I use in this post here.
Once you’ve gathered your supplies, it’s time to get started! Let’s dive in, shall we?
Step 0: Whatcha Gonna Write?
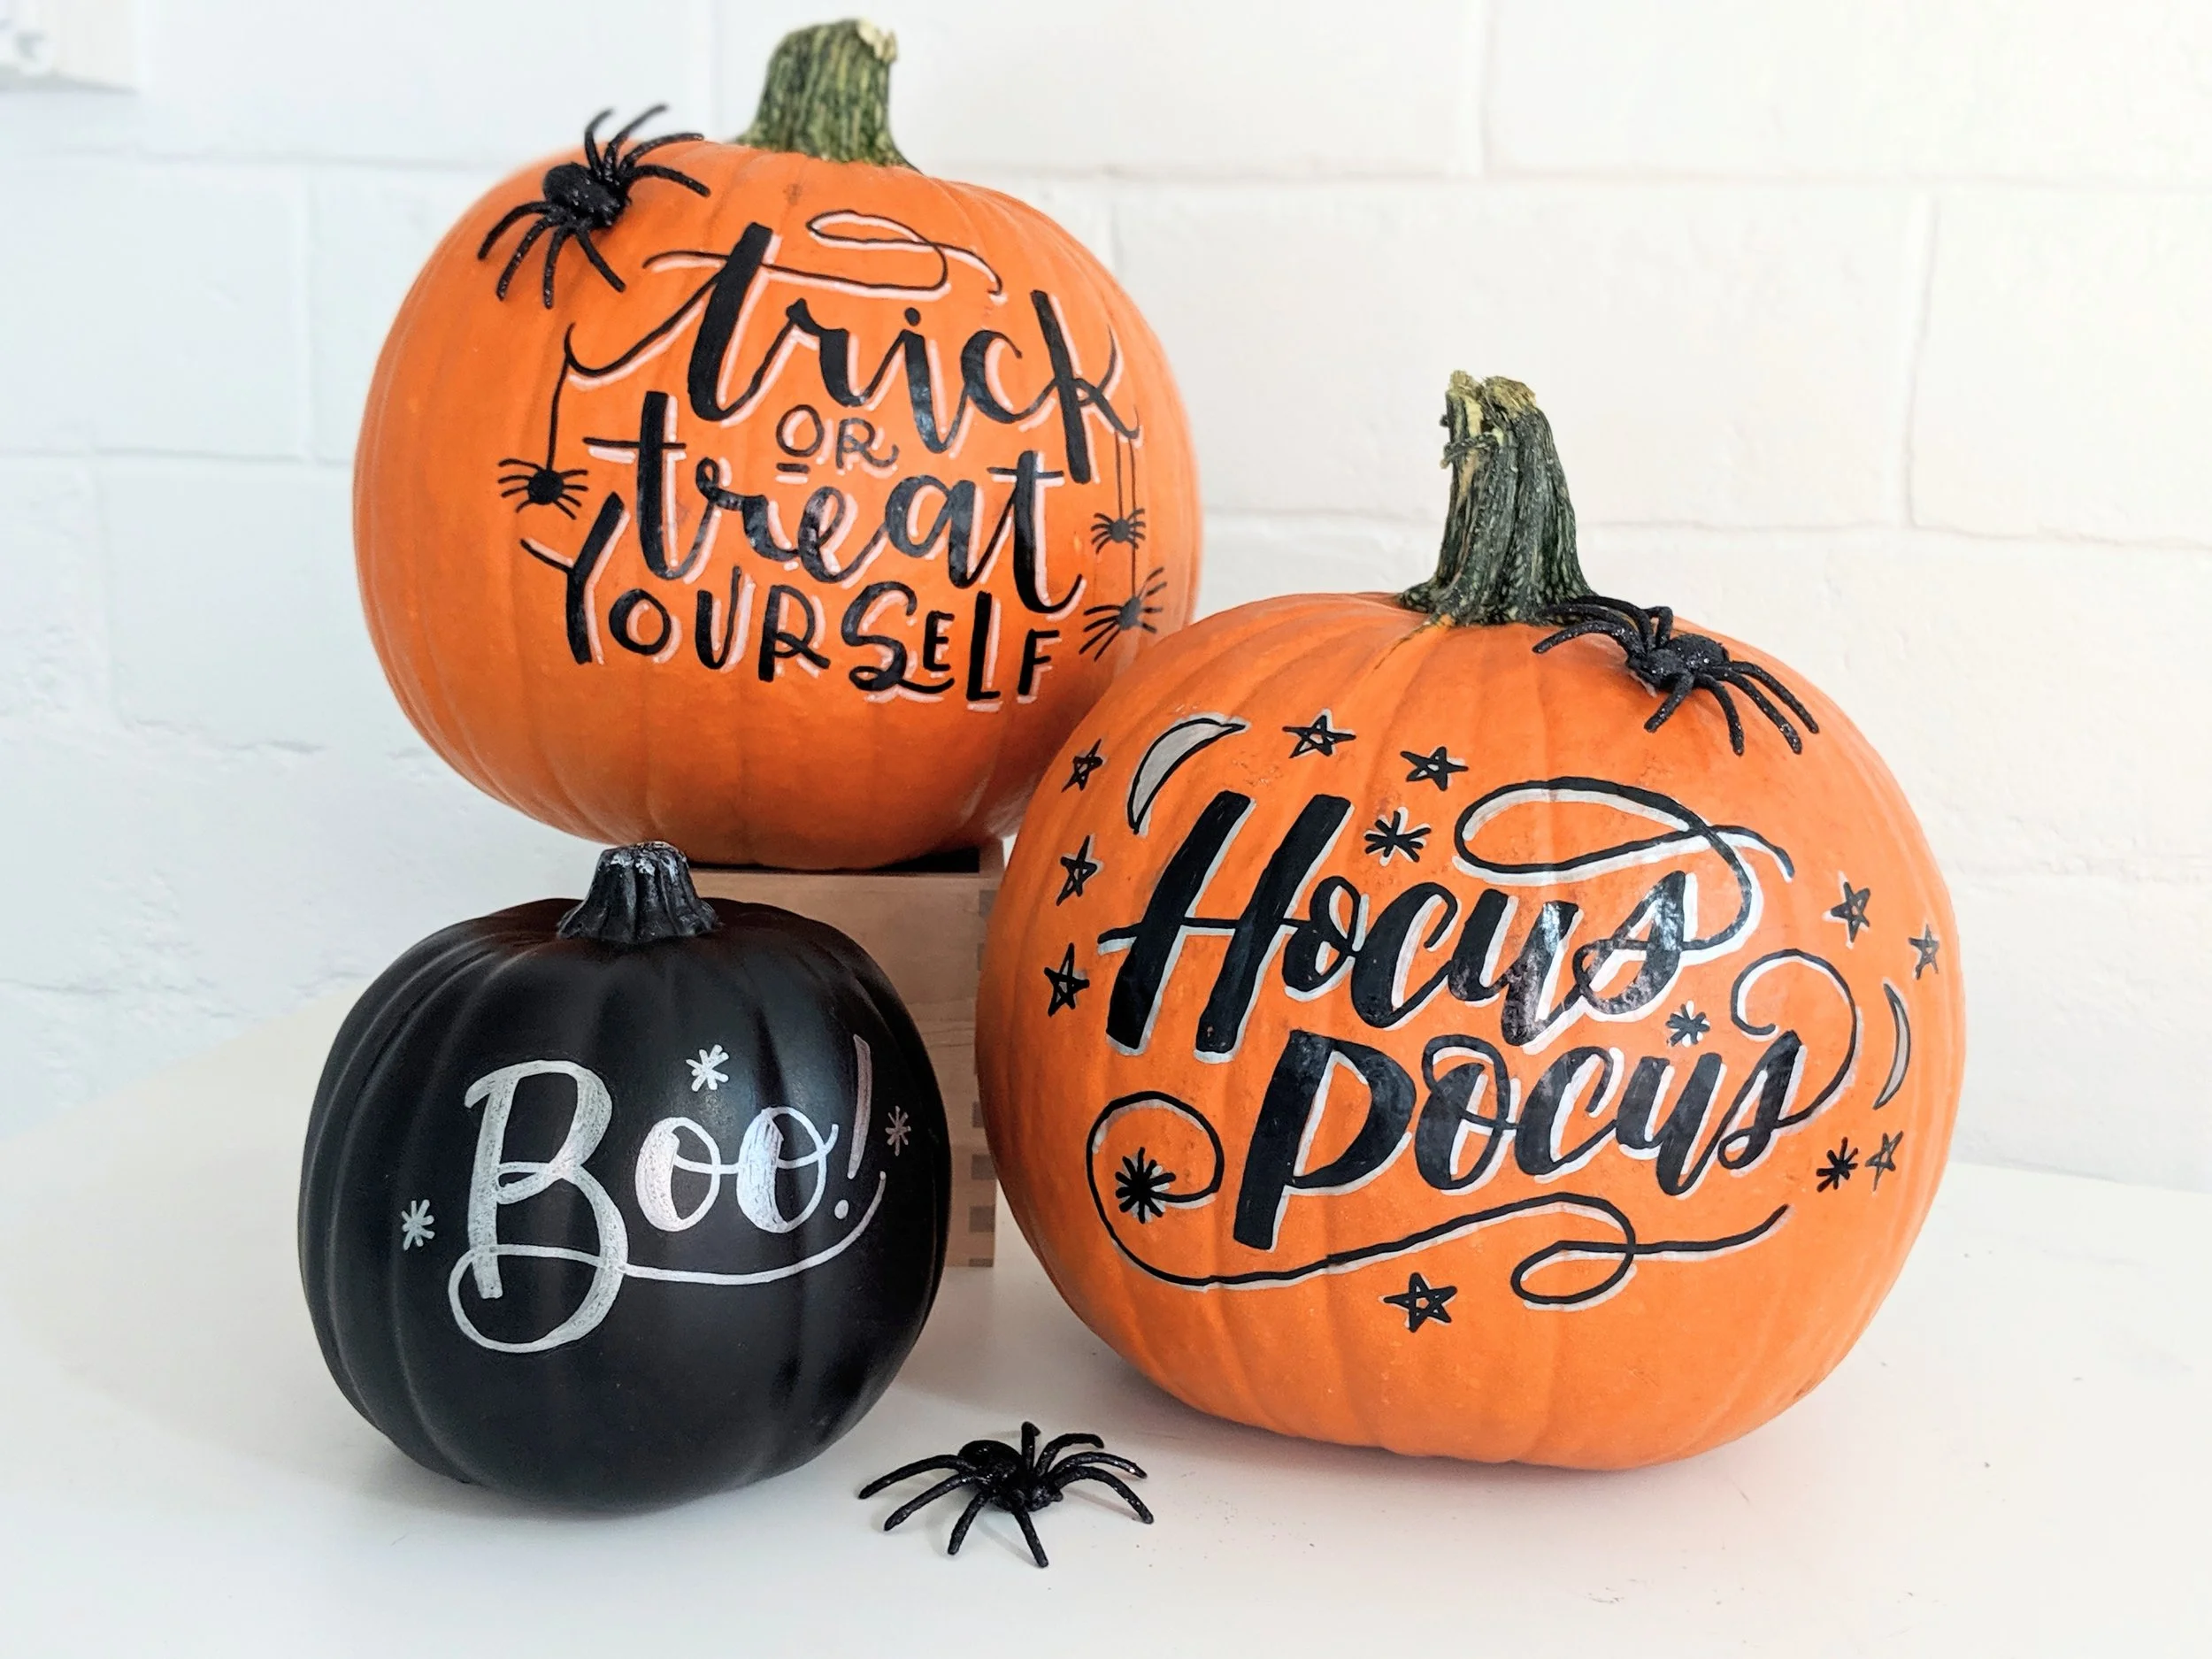
Before we do anything, you gotta decide what you’re going to put on your pretty pumpkin. If you head over to Pinterest, you’ll be bombarded with ideas, so let me just go ahead and share a few of my favorite phrases for pumpkins ranging from the practical to the ultra punny.
Welcome/your house number
The YOUR NAME Family (unless your last name is Shrack and your husband’s last name is Tritch, in which case the combination of two such aggressive, German names is too terrifying even for Halloween)
Hocus Pocus (I have a template for you!)
Something wicked this way comes
Trick or Treat Yourself (Parks & Rec, anyone?)
100% That Witch (because Lizzo)
Witch Better Have My Candy
Here for the Boos
Creep It Real
Welcome Great Pumpkin
Eat, Drink & Be Spooky

Clean pumpkin in my lap — just living’ the dream over here!
Step 1: Prep your pumpkin
If you’re using a real pumpkin, you’re gonna wanna give that bad boy a good scrub before you start scripting. It did grow up in the dirt, after all. Once it’s all clean, be sure to get it THOROUGHLY dry - if it’s damp, you might have some trouble with bleeding when you start scripting.
When you’re ready to start adding your design, it’s time to find a comfy spot on the floor — seriously. Here’s the thing: pumpkins are round. And they roll. And you can prop them up and stabilize them on a table to keep them from rolling while you script… or you can sit cross-legged on the floor, plop the pumpkin in your lap and get to work. I go with the latter option, and if you’re physically able, I recommend you do, too. If not, no worries — you can always take the first option and prop up the pumpkin with dishtowels to prevent it from rolling and shifting.
Step 2: Outline your design
If this is your first calligraphy pumpkin (awww, what a milestone!) or if you are aiming for a super polished finished piece, I recommend you first create a template. I created mine in Procreate on my iPad and printed it out, but you don’t need fancy schmancy tech to create your template — just a piece of printer paper and a brush pen.
Measure the area of your pumpkin you want to script on, and then mark off that are on a piece of paper. Sketch out your word or phrase in pencil, and then put it down in ink with your brush pen. Because we want the design to be pretty large, I recommend you use a Tombow Dual Tip Brush or a brush pen of similar size.
Once you completed your template design, cut around it. Because we’ll be placing it on a round surface, we want the template to be as moldable as possible, and excess paper makes that a little tricky.
Next, you want to cover the back of your template in graphite. Grab your pencil and go to town! If you’re using a black craft pumpkin, cover the back of the template in anti-dust chalk instead.
With the back covered in graphite or chalk, place the template exactly where you want it, and gently begin to mold it around the pumpkin. Areas of the template will fold and crease, and that’s okay. If you’re having difficulty getting it to lay flat, cut some slits around the design — it’s will help it mold to the curve of the pumpkin a bit easier. Once it’s in a spot you like, secure the template to the pumpkin with some tape.
Now it’s time to trace! Use the ballpoint pen to trace the outline of your design. Apply a pretty heavy amount of pressure, but not so much that you tear through the page. Before you get too far along, peel back the edge of the template to make sure it’s transferring. If it’s not, add some more graphite/chalk to the back of your template.

Cover the back of your design with graphite.
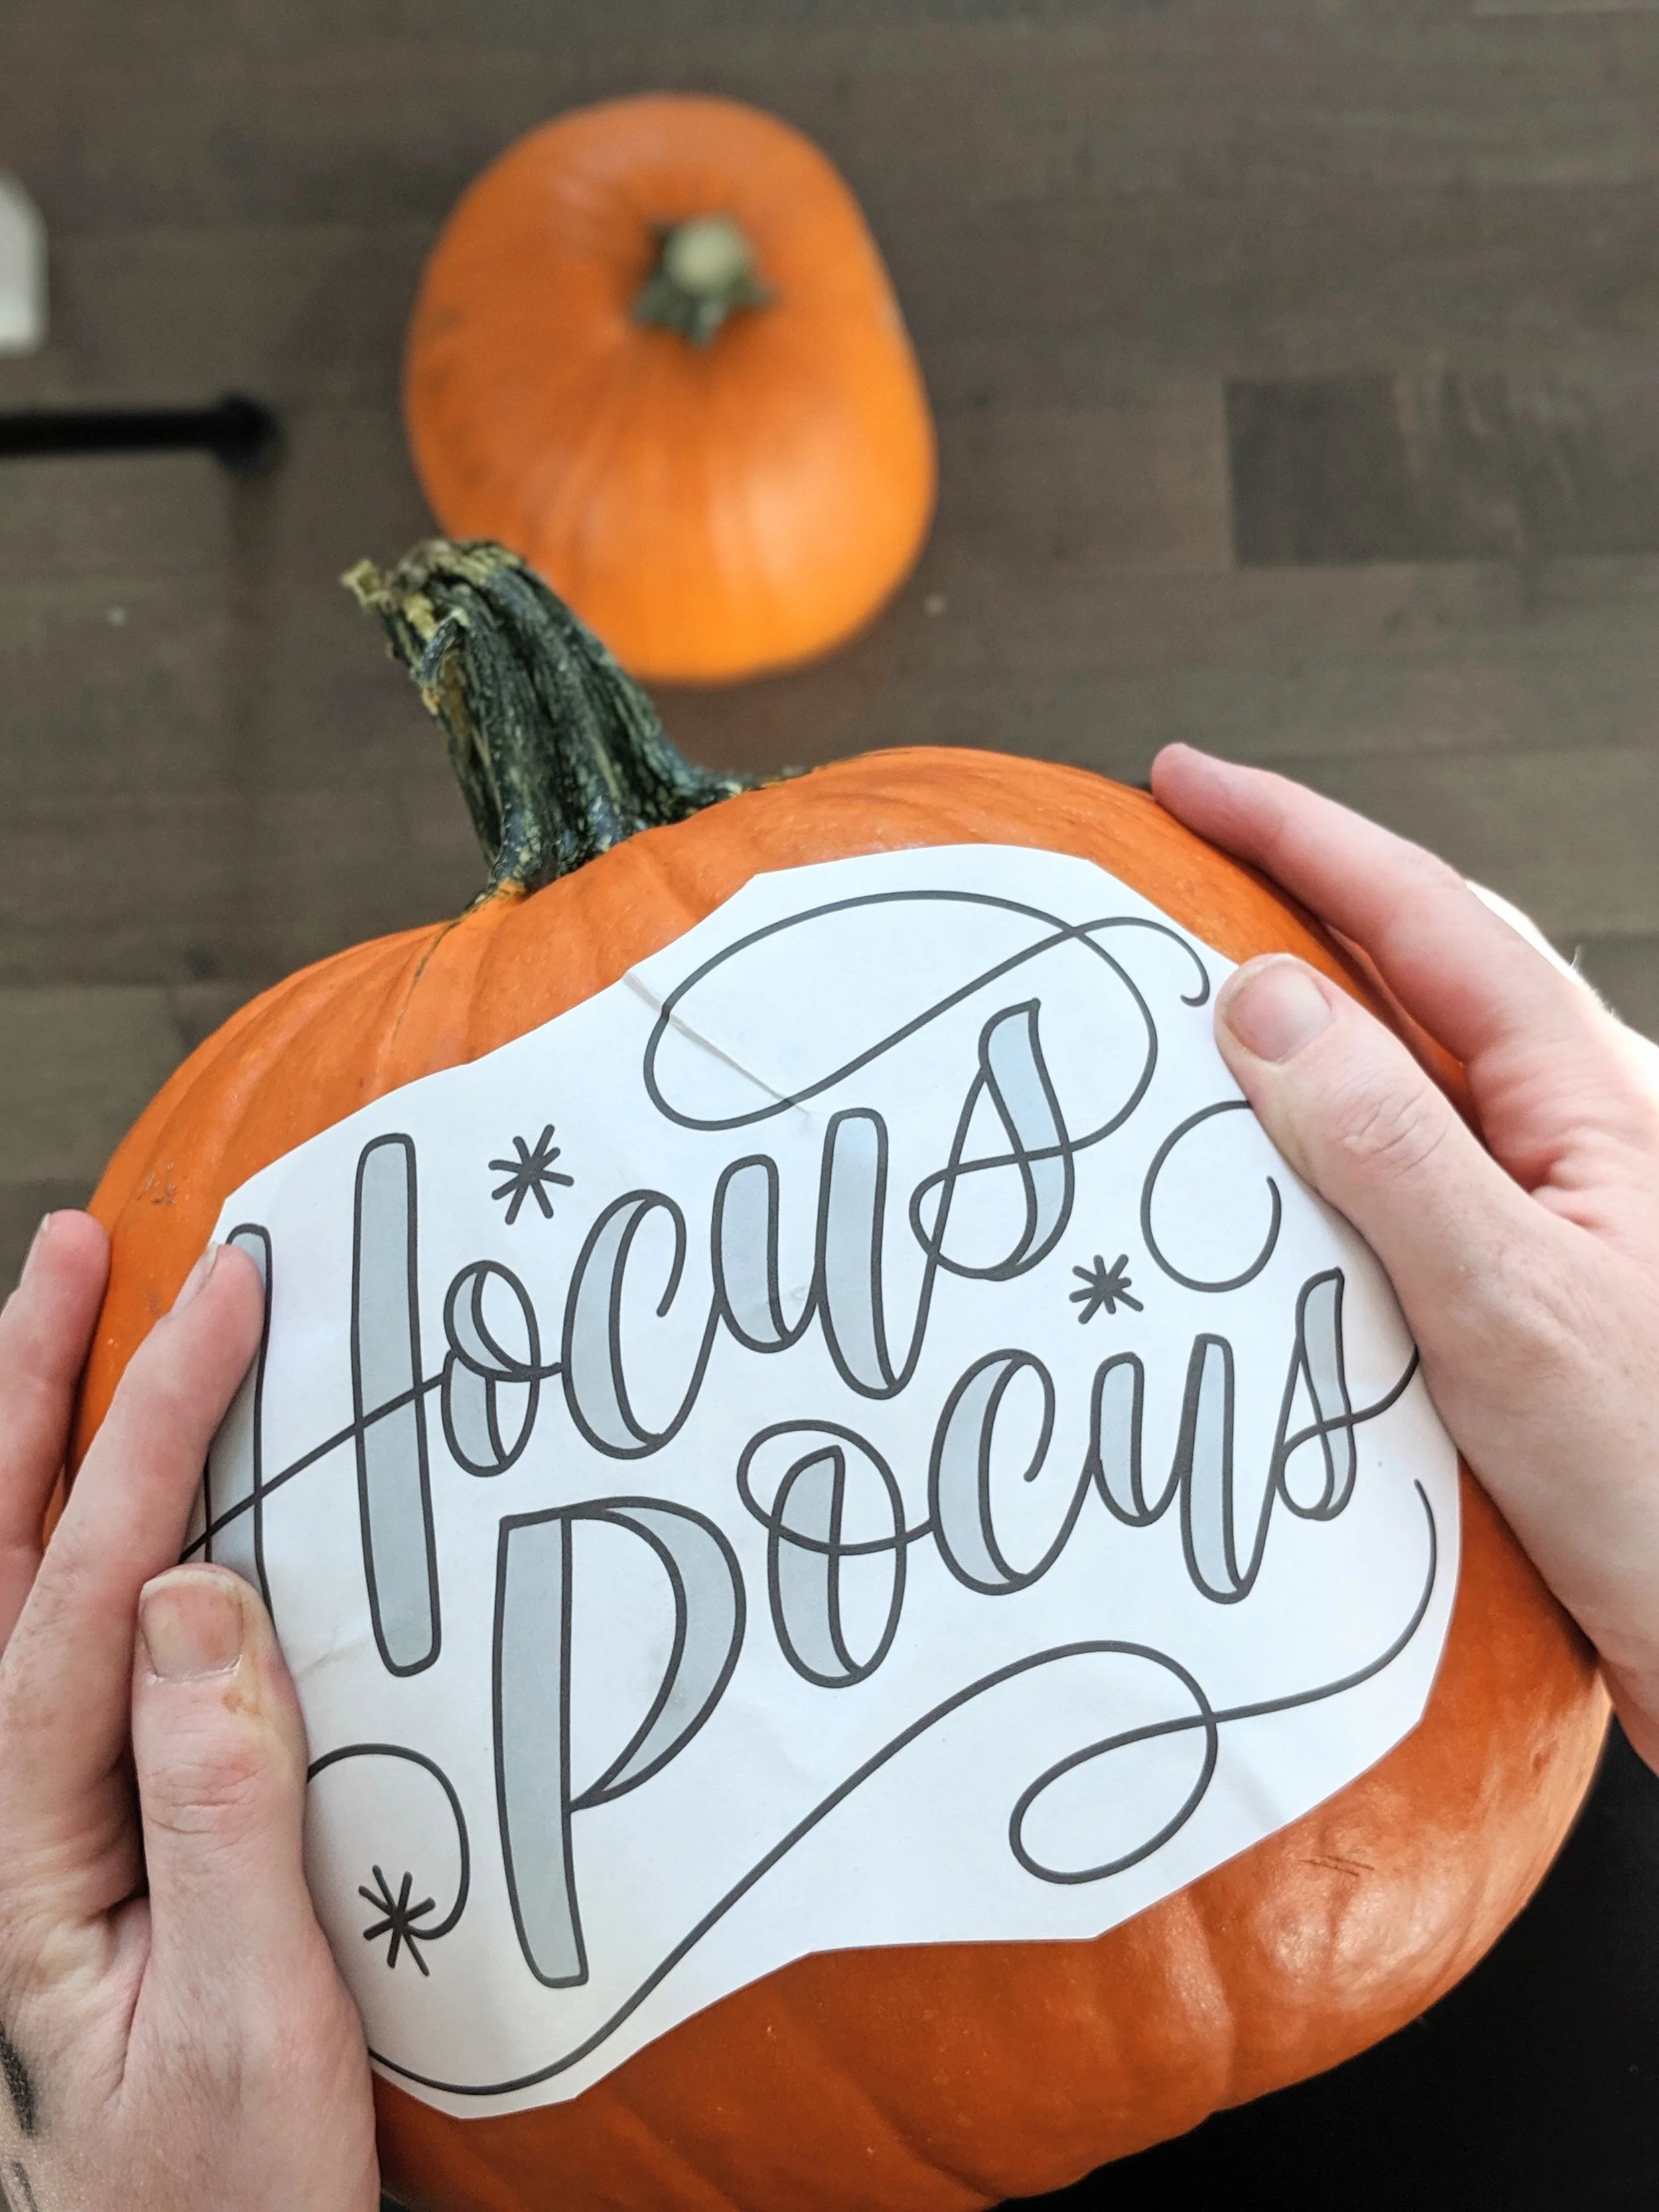
Mold the template over the pumpkin - you’re going to have some creases and folds - totally okay!
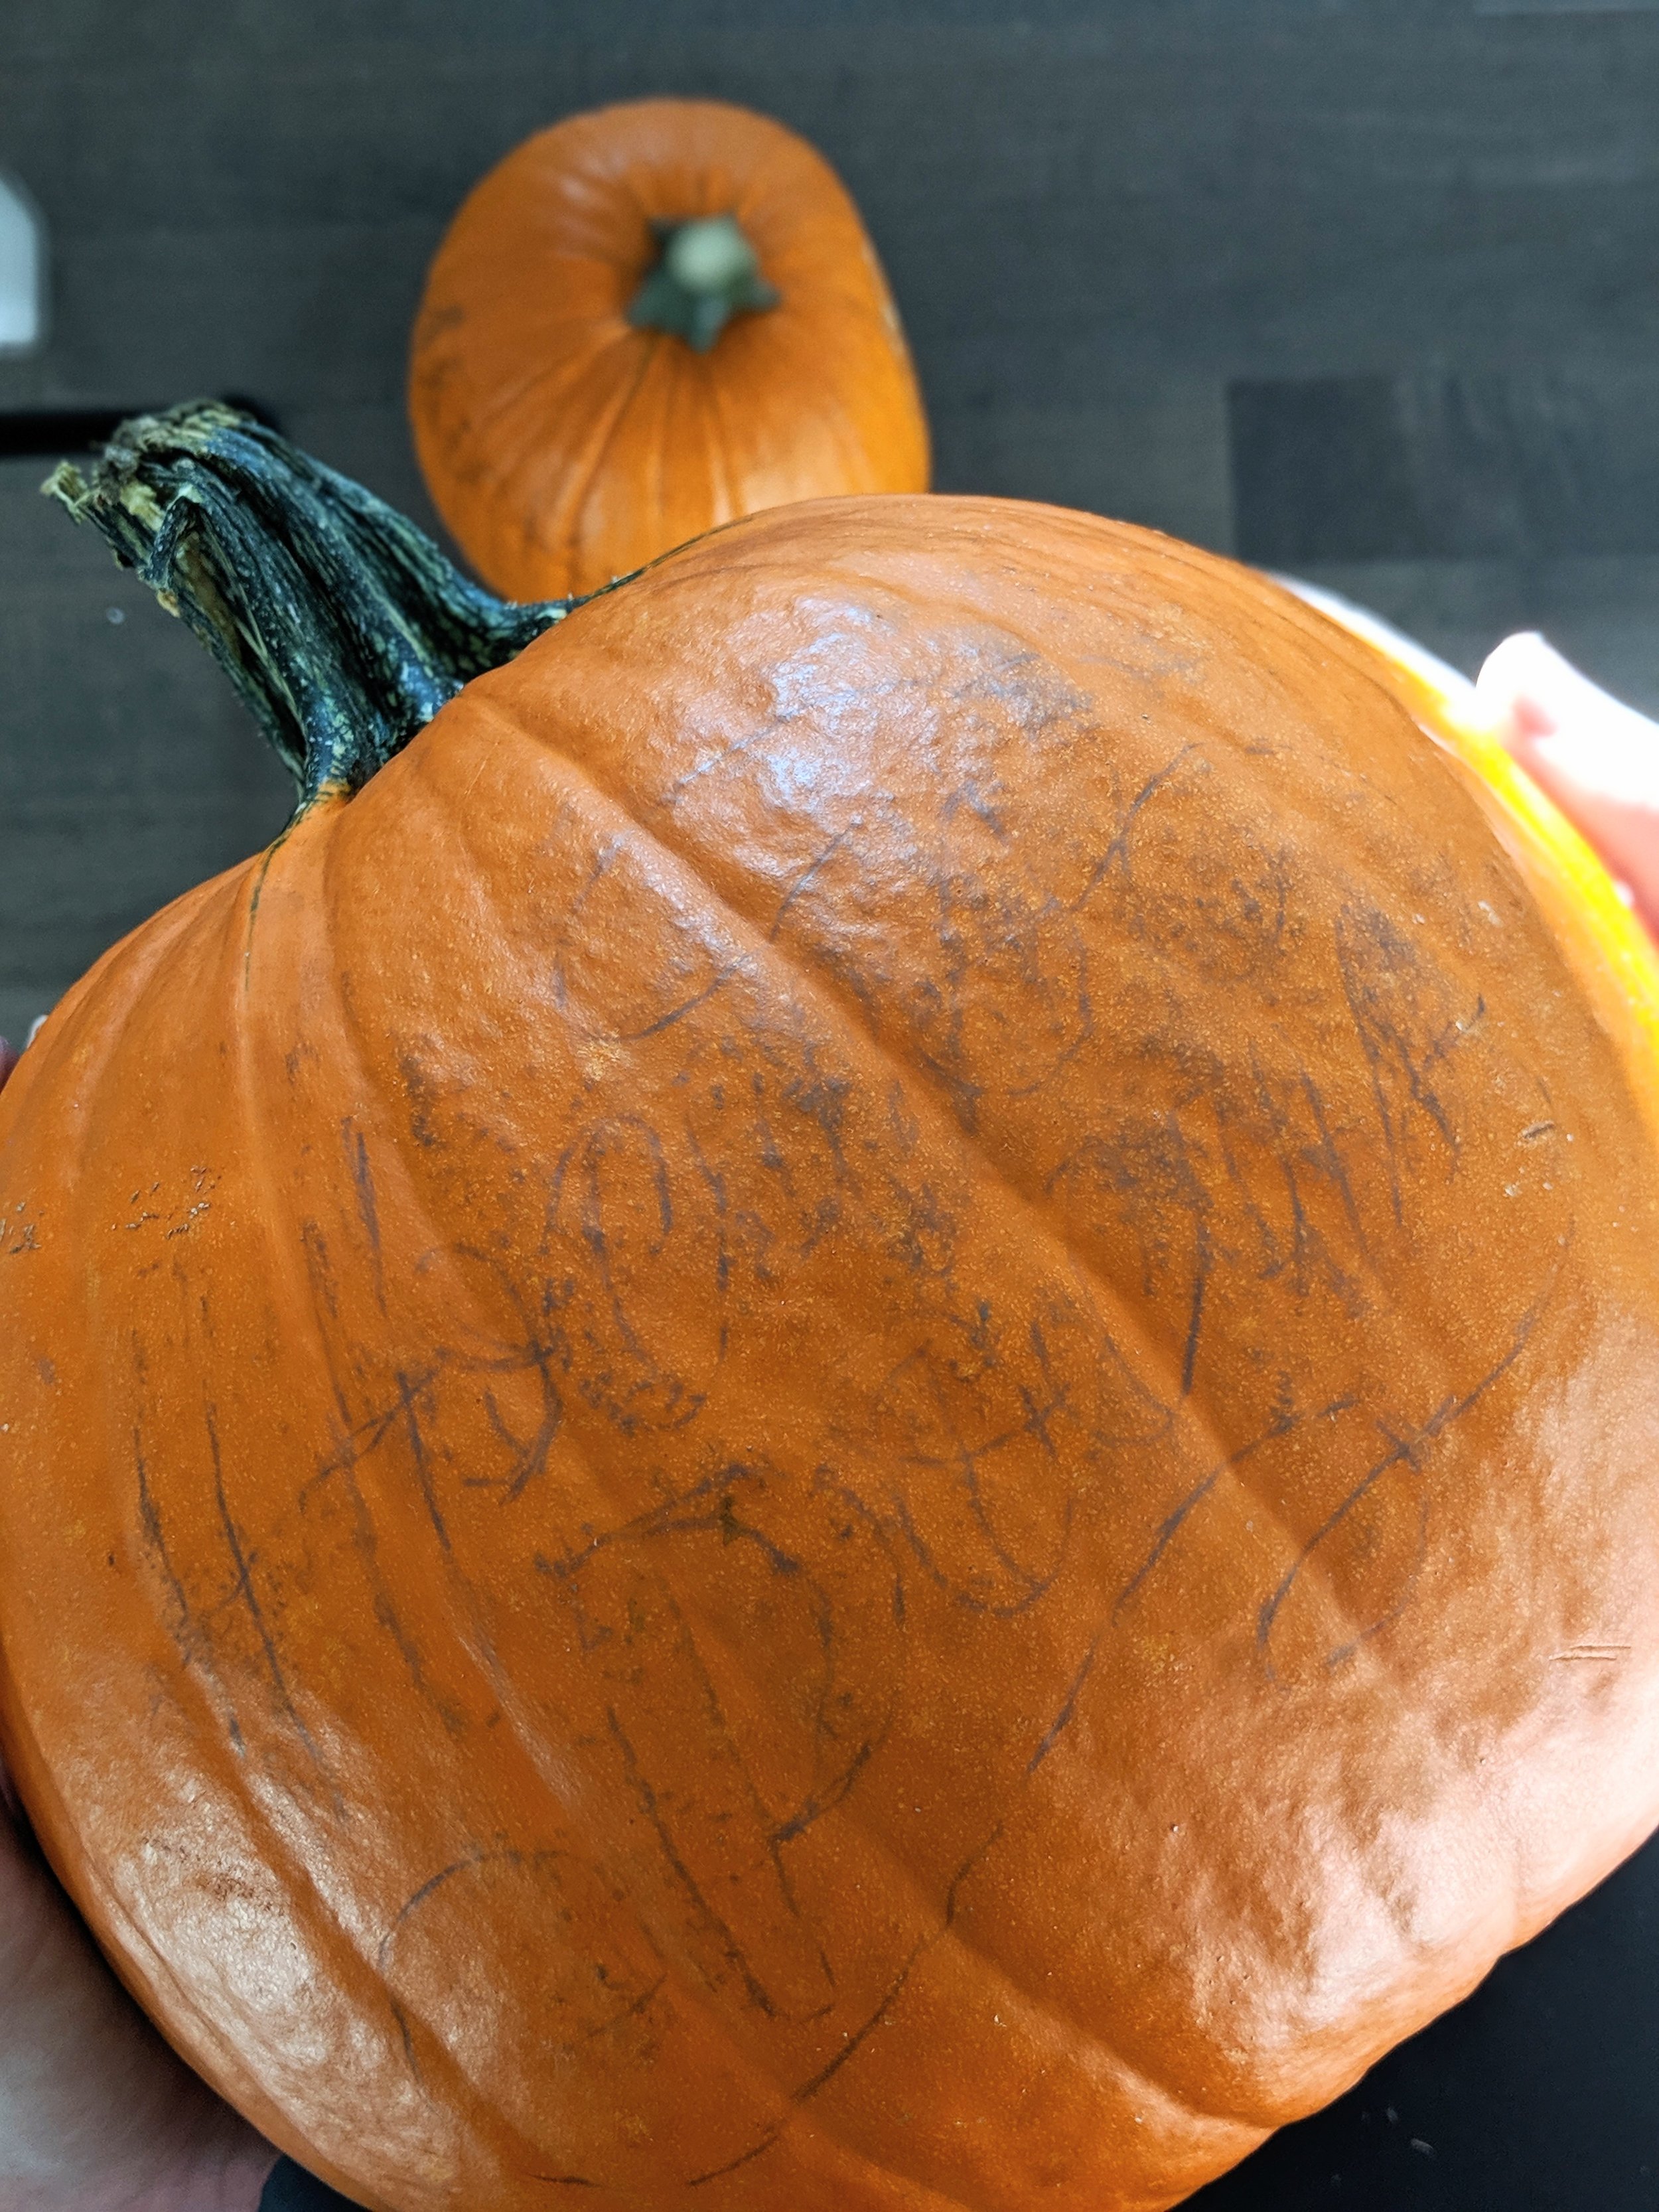
The pressure from tracing the template with a ballpoint pen will transfer the design to your pumpkin — et voila!
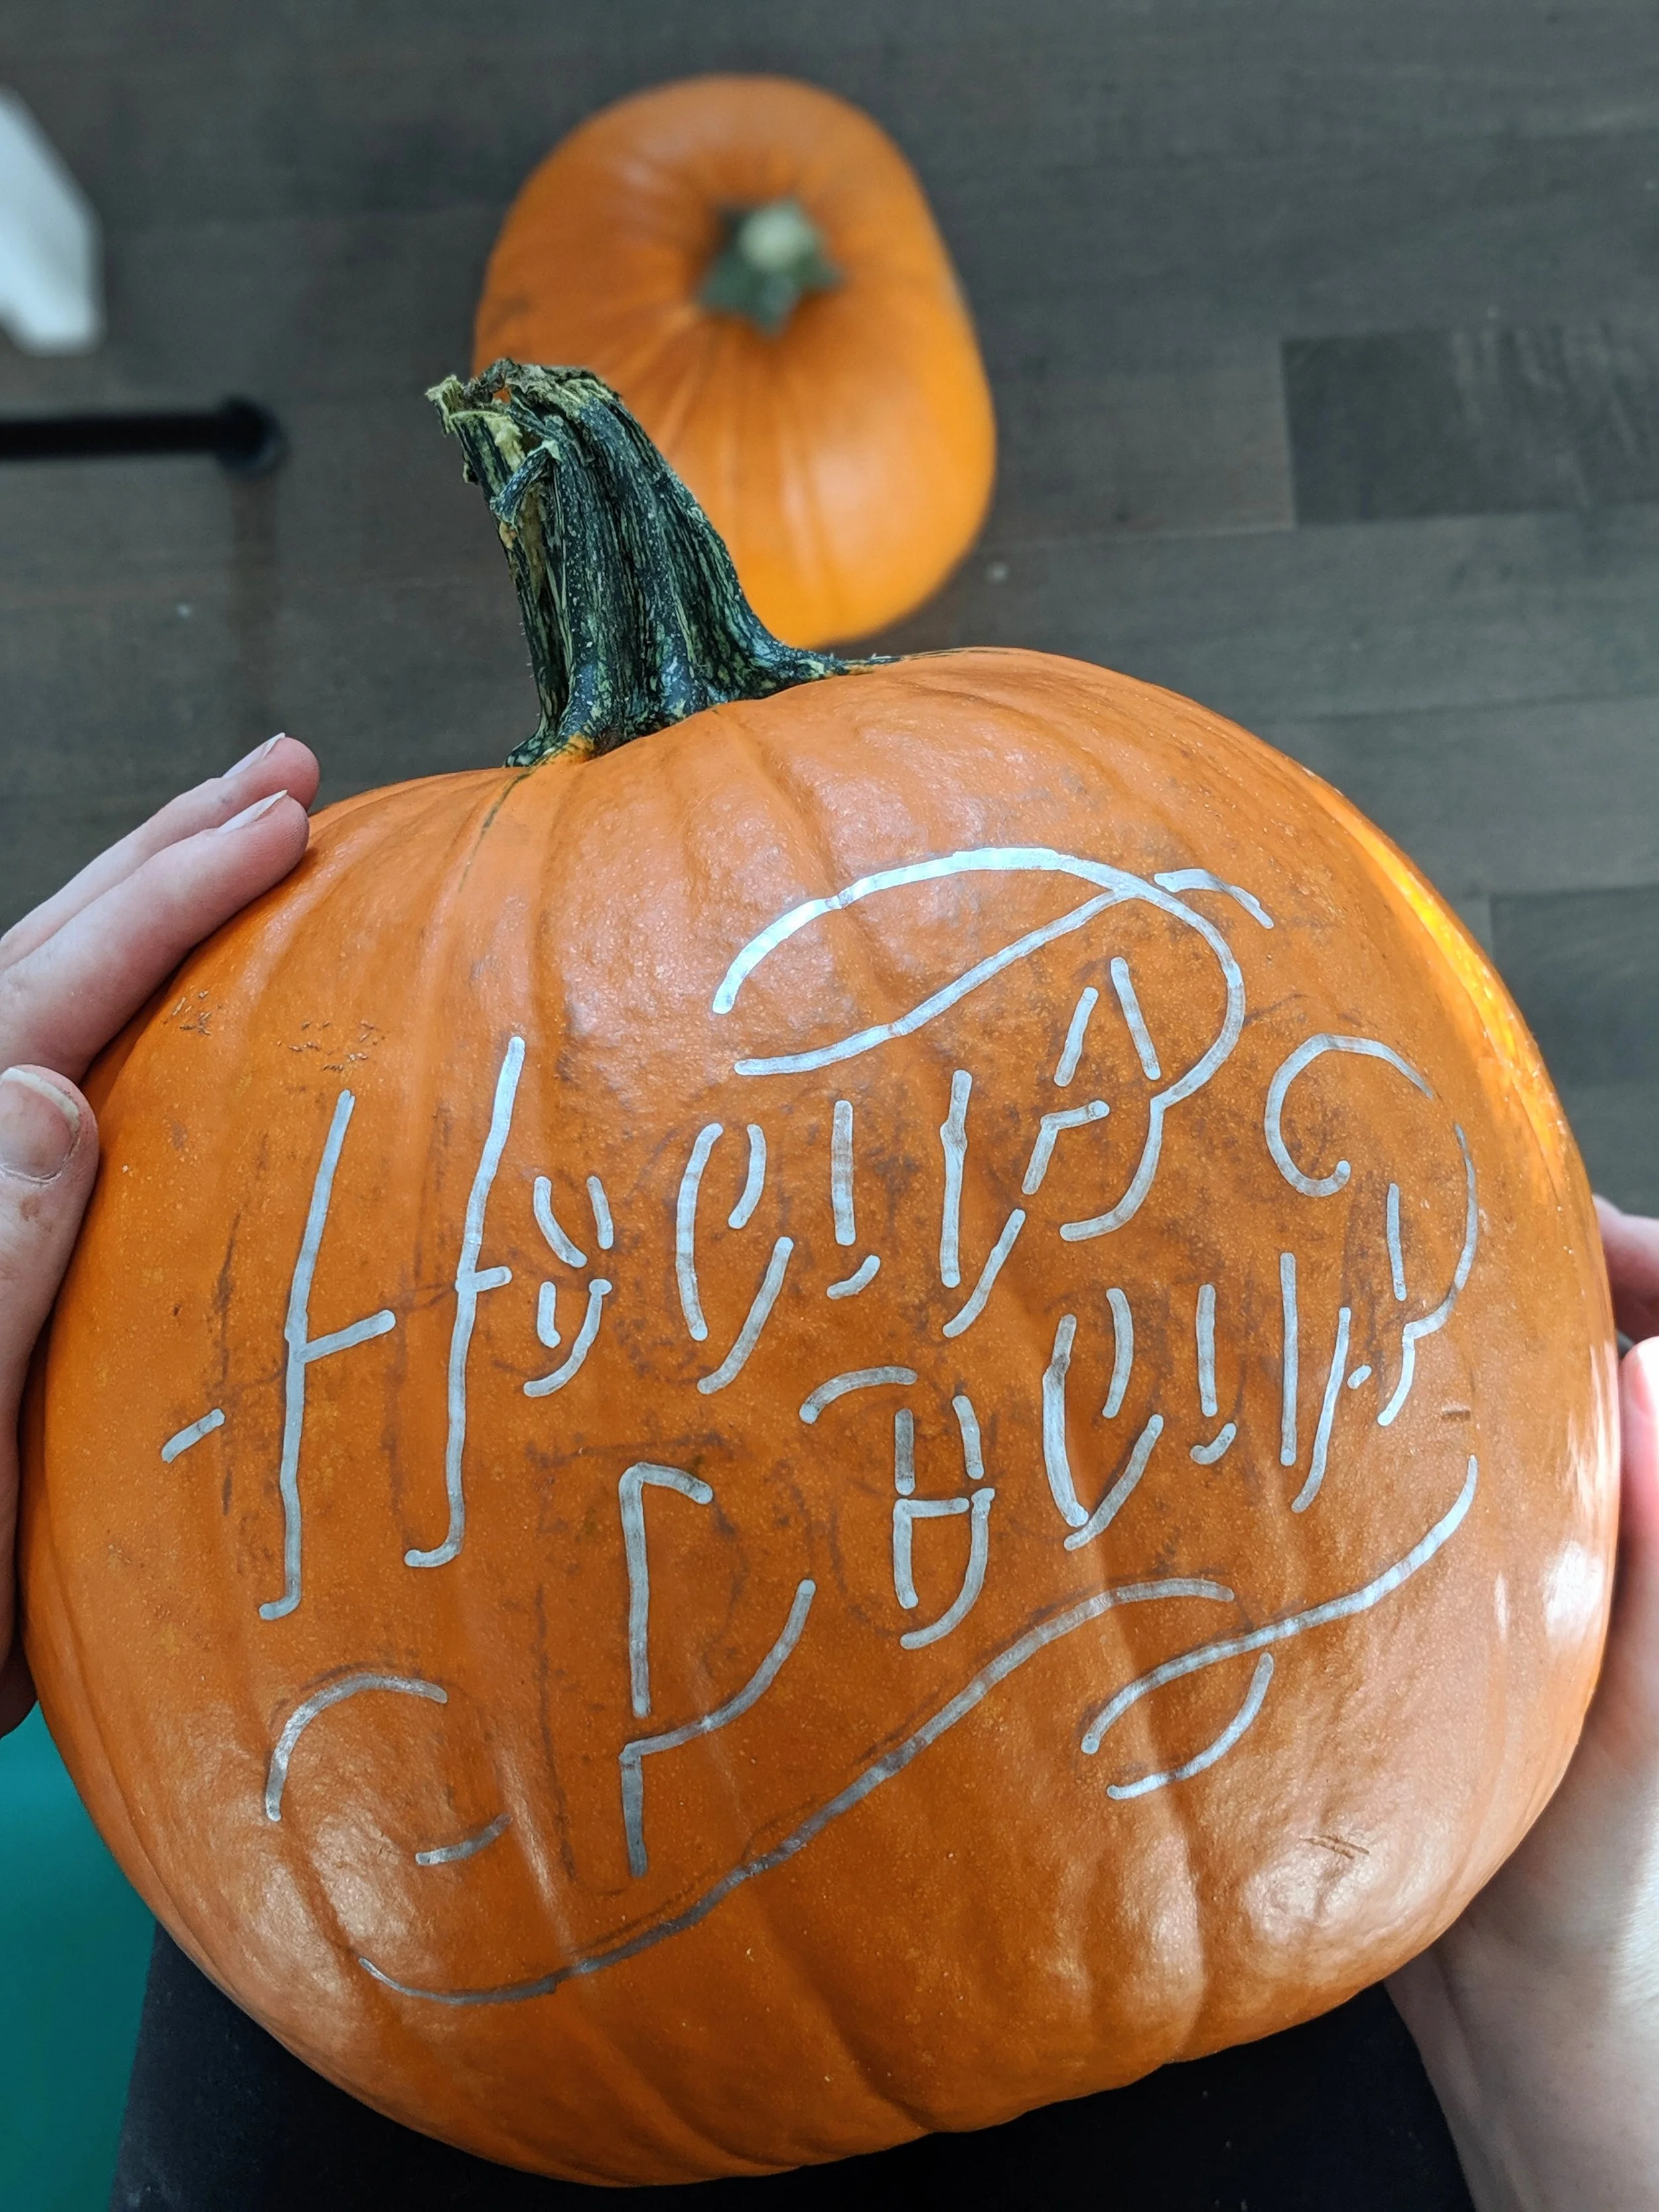
Don’t want to use a template? No problem! You can script your design directly on the pumpkin using a pencil or a chalk pencil (if you’re scripting on a black craft pumpkin). Start by scripting out the word or phrase, just as you would if you were writing normally.
To give our words the look of calligraphy, we are going to add some thickness to some of our strokes. If you’ve taken one of my calligraphy classes, you know that downstrokes are always thick lines — those are the strokes you’ll add some weight to. Have no clue what I’m talking about? Retrace what you just scripted — every time you bring the pencil down and toward you, that’s a line you want to make thicker. Make sure the thick downstrokes you’ve mocked up in pencil are all about the same width — otherwise, it will look a little off.

Using a chalk pencil on this craft pumpkin — you can find them at sewing supply stores in the notions aisle (seriously).

On the second pass, I add weight to the downstrokes - those are areas I will fill in later.
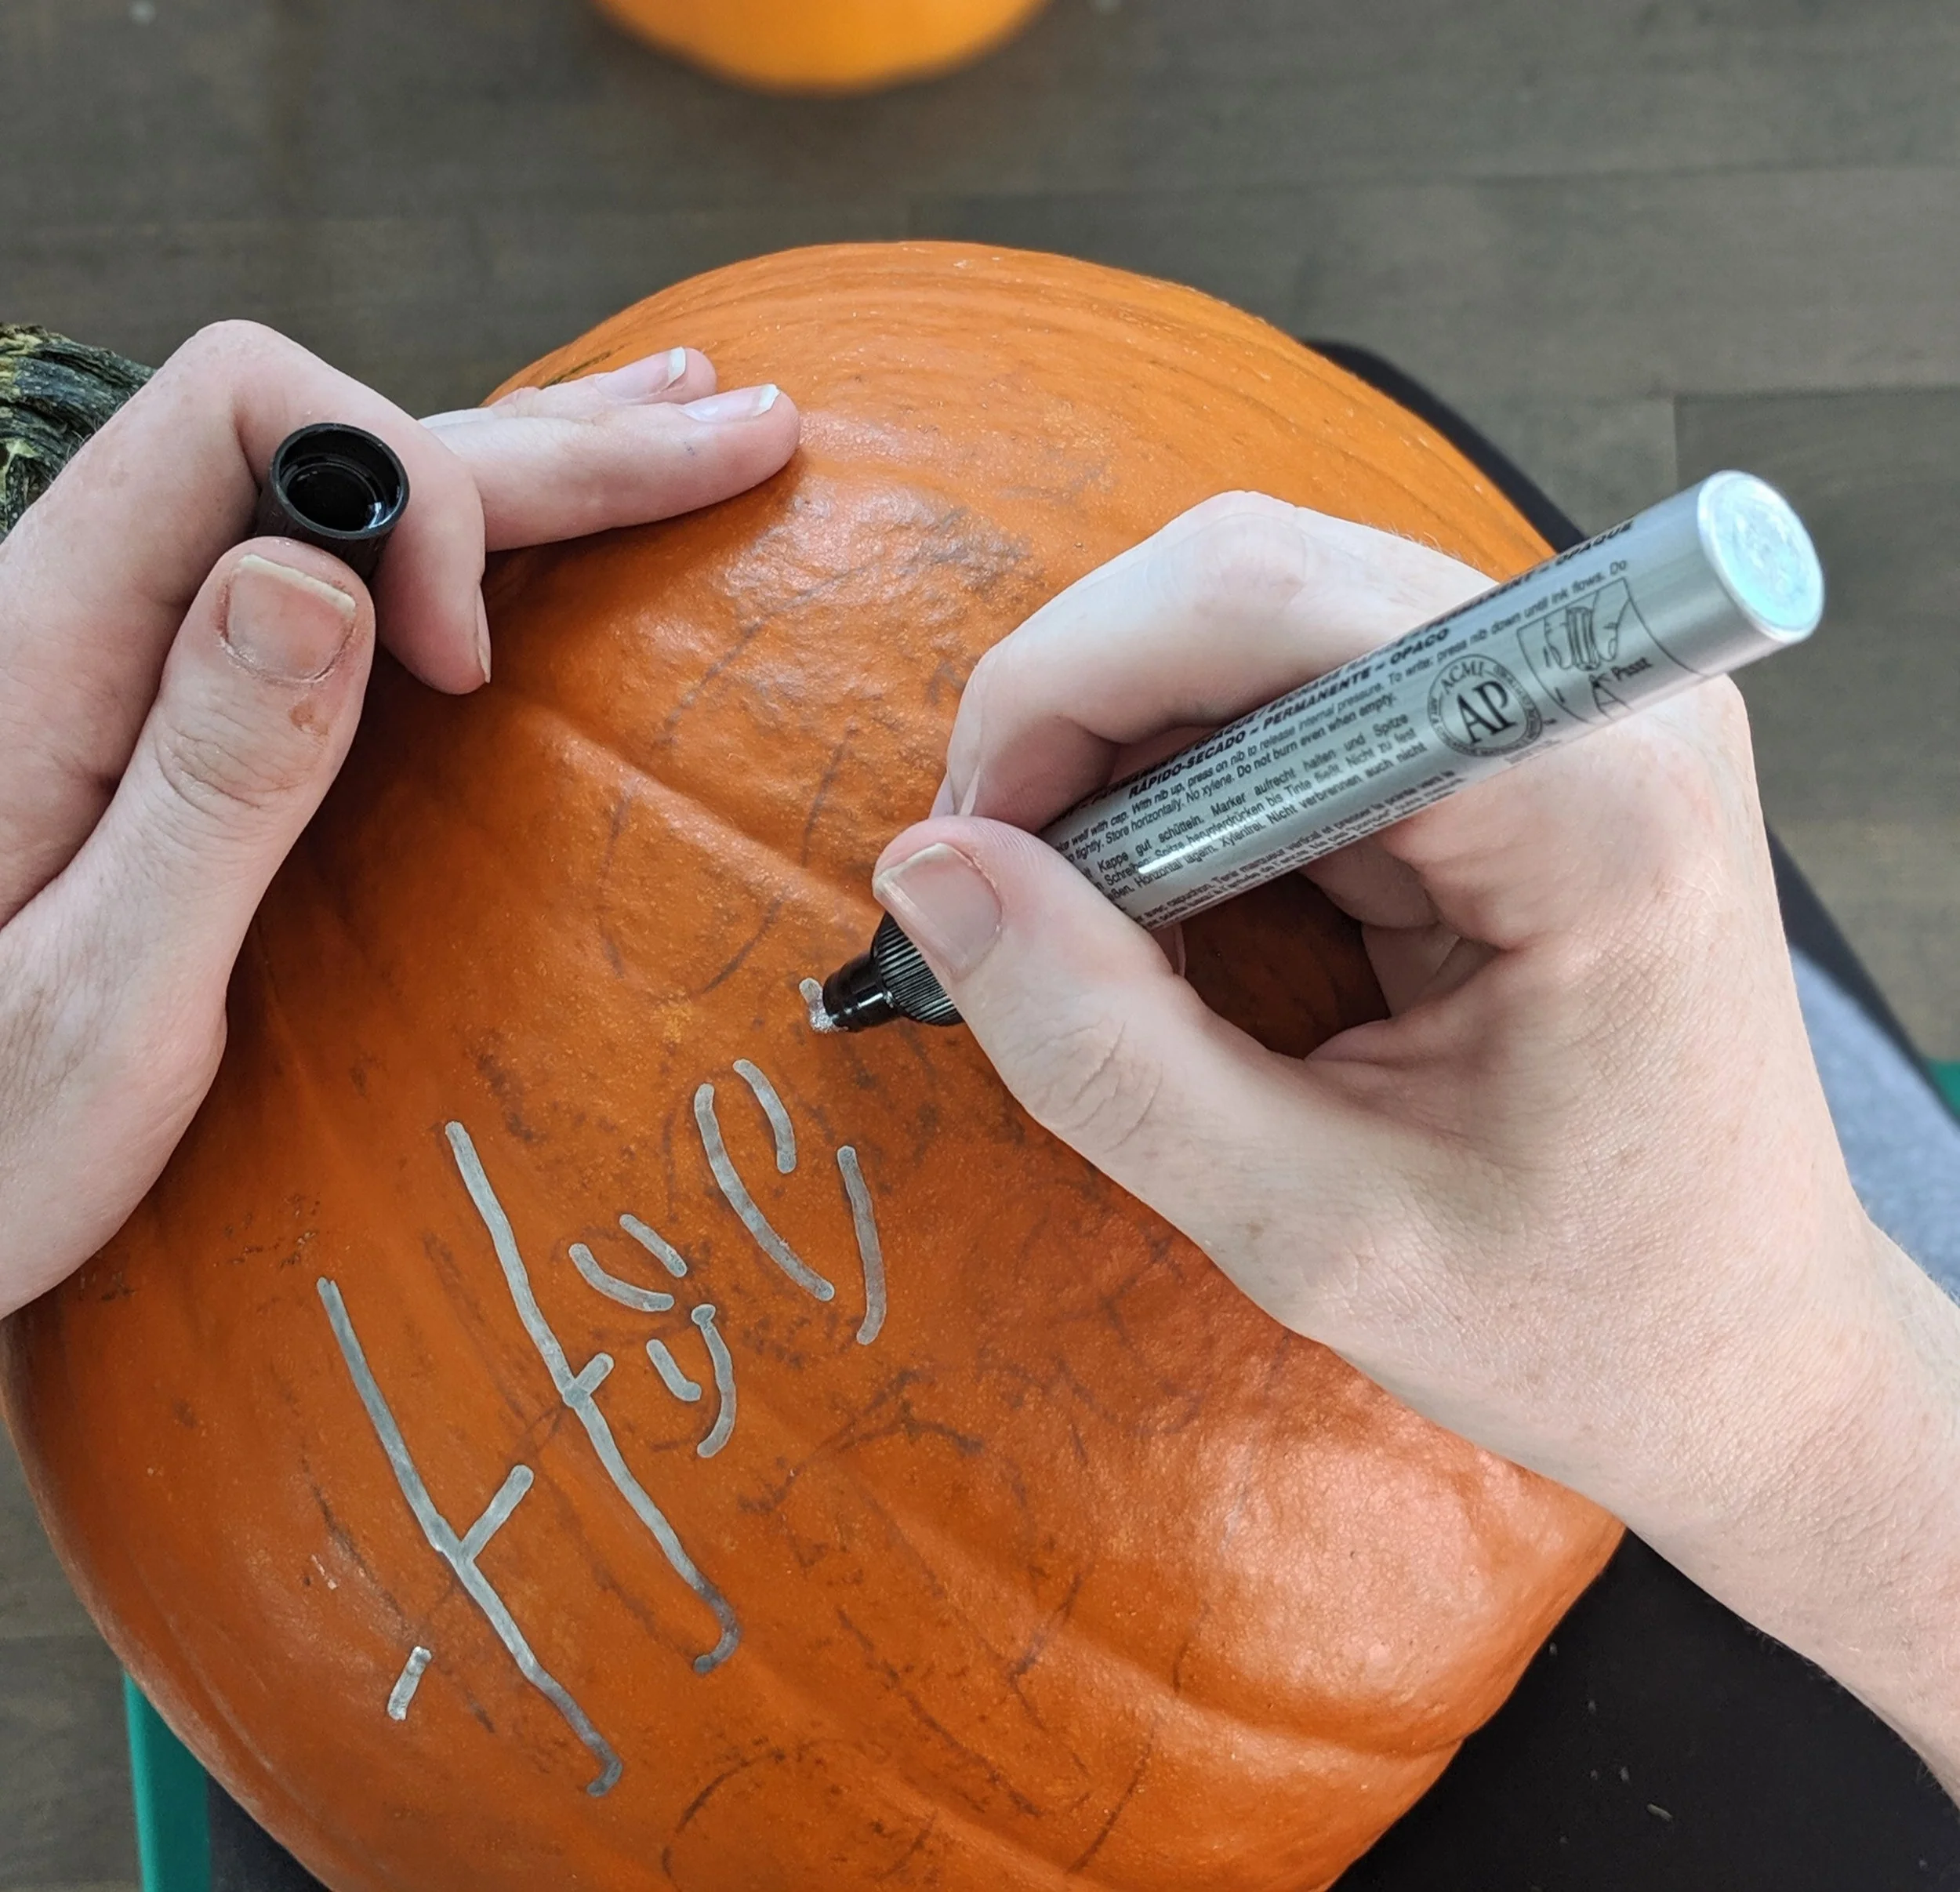
Step 3: Trace & Paint
Time to bust out the paint pens! Trace over the lines you just drew/transferred with the pen, filling in mock downstrokes. Sound too easy? Okay, well maybe a little. :) Here are some tips to help you as you go.
Tip #1: Adding a Shadow. You can really make your design pop by adding a shadow to your script. If you want your shadow to butt up directly against the words, I recommend you put that down in paint first. Here, I’ve done a shadow on the bottom right of my design. To get this look, I simply traced along the right edge and underneath every stroke in my shadow color. You can see what that looks like here.
Then, when I script over in black, I overlap the shadow just slightly, leaving no space between the letter and the shadow.

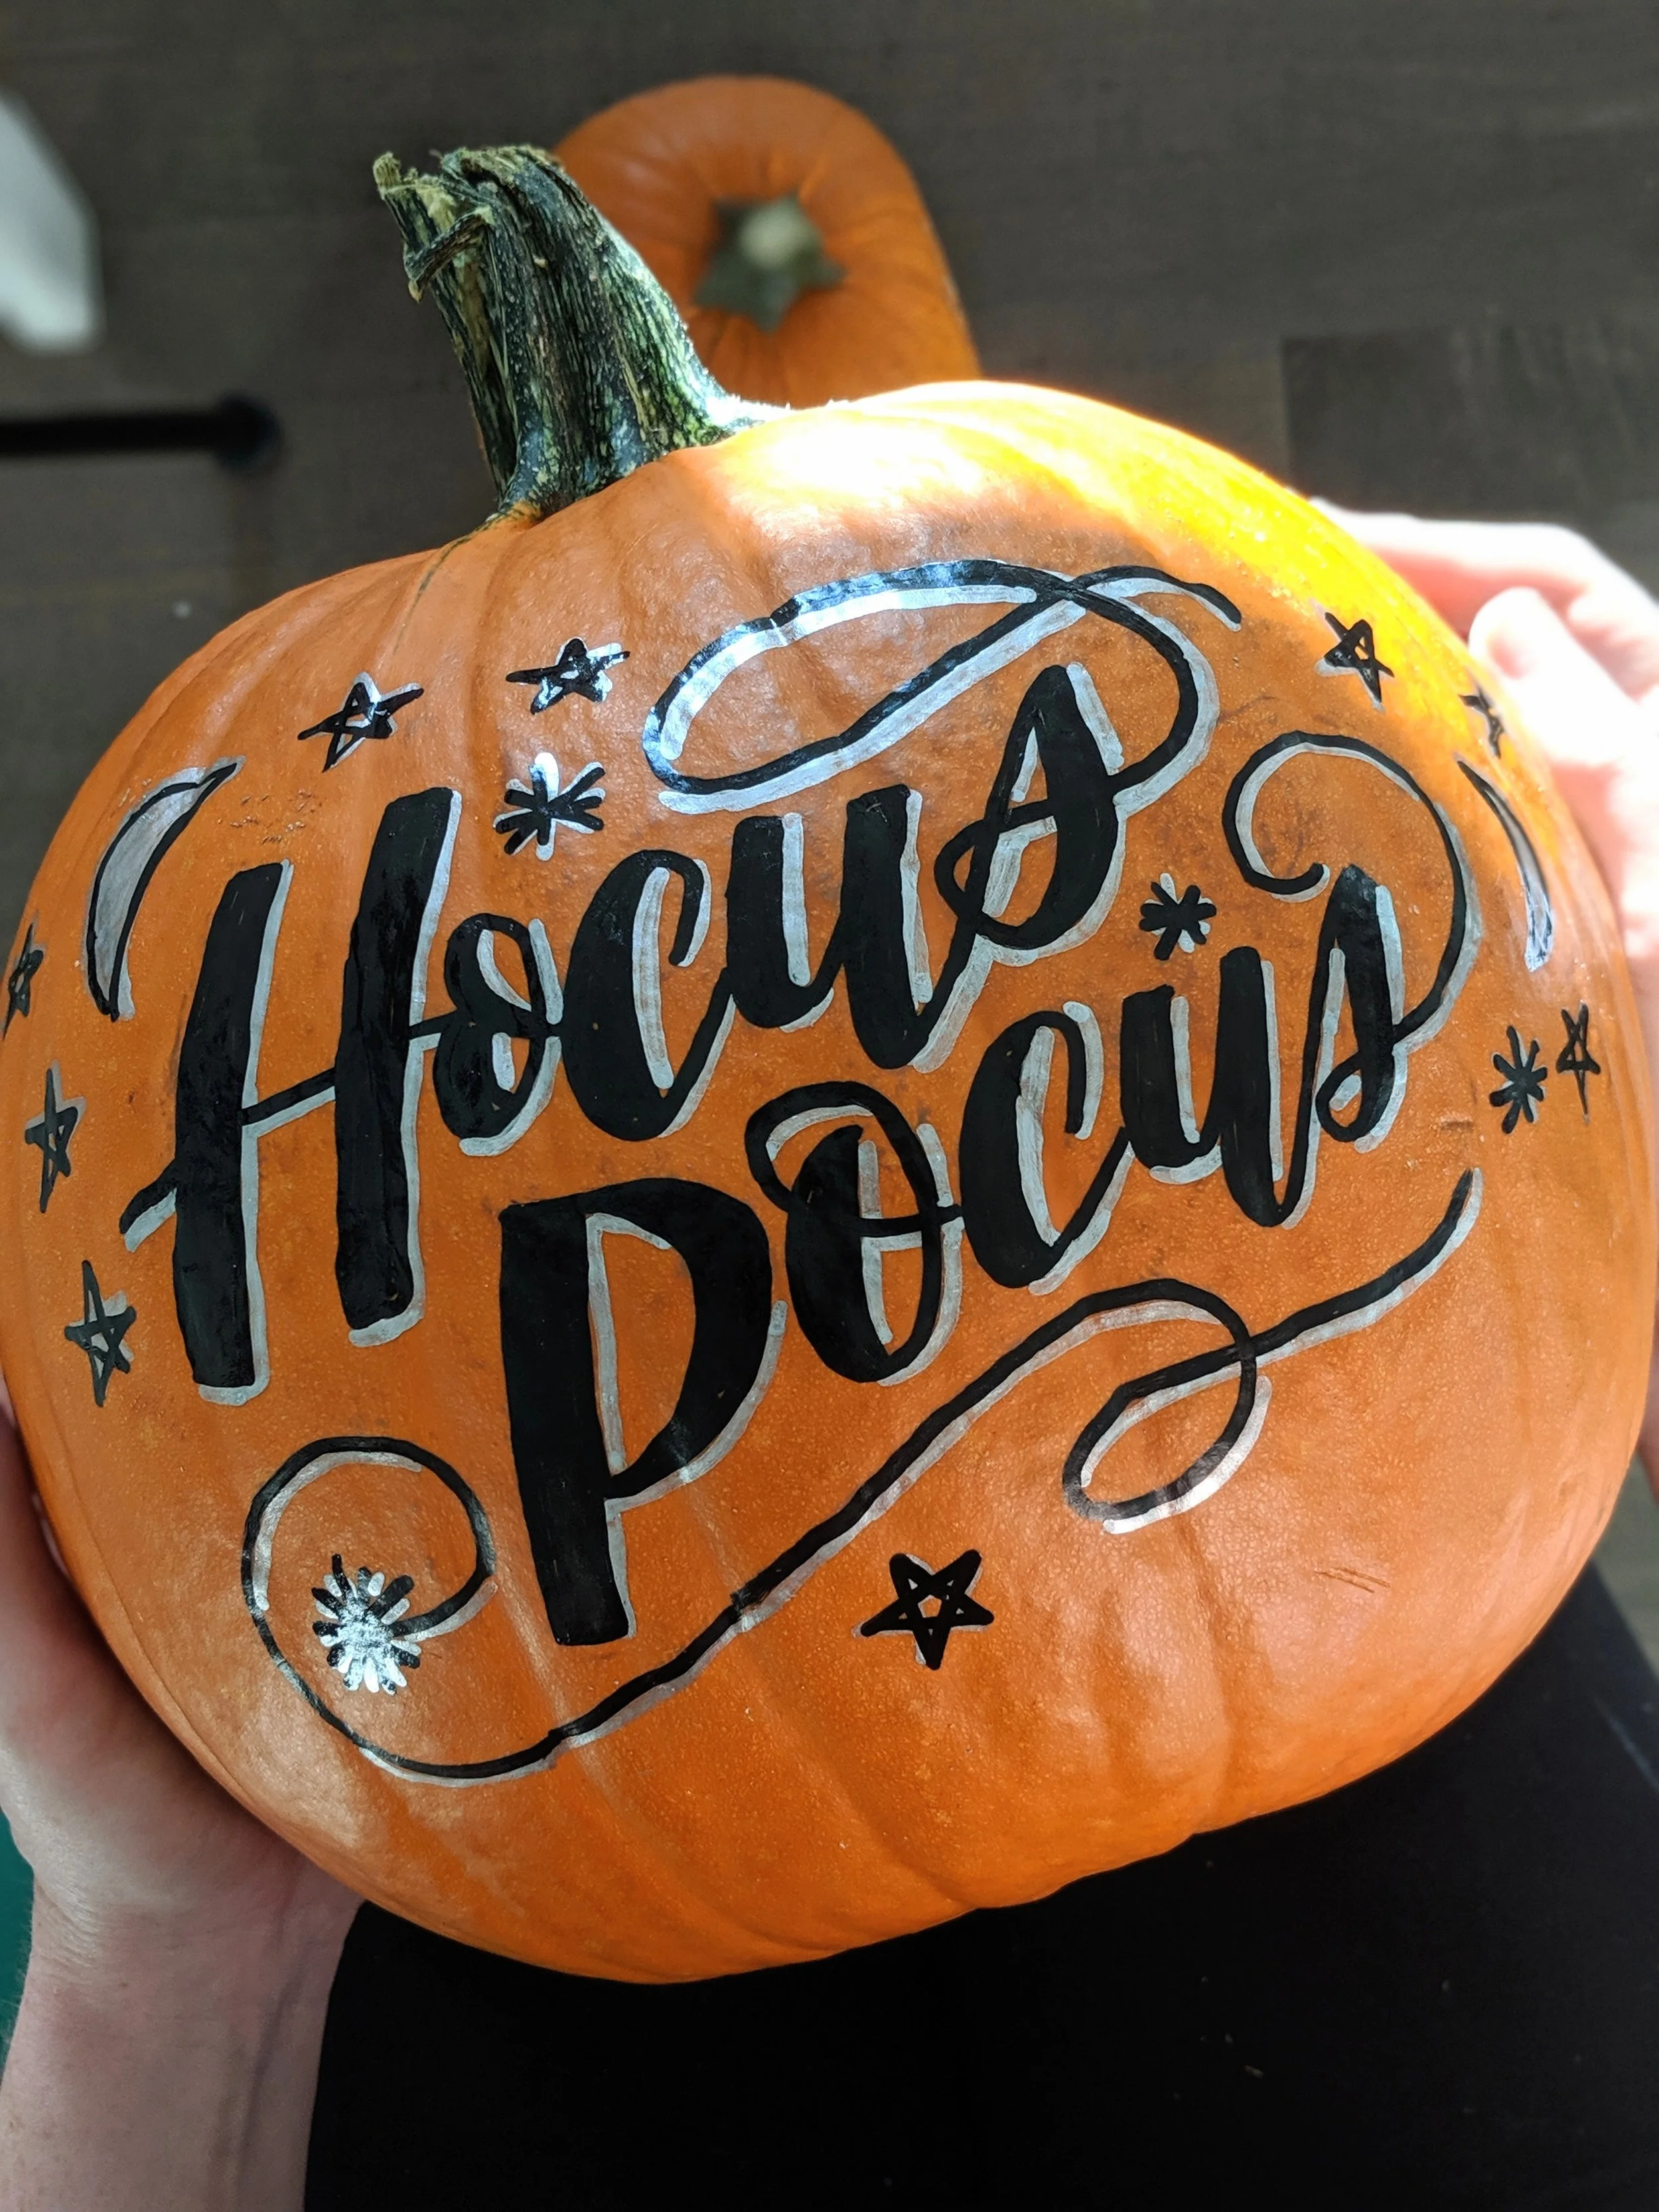
But that’s not the only way to create a shadow! You can also draw lines that are slightly apart from the letters. This method gives the appearance that the letters are floating… and is great if you decide to add a shadow AFTER you’ve scripted the word, like I did here.
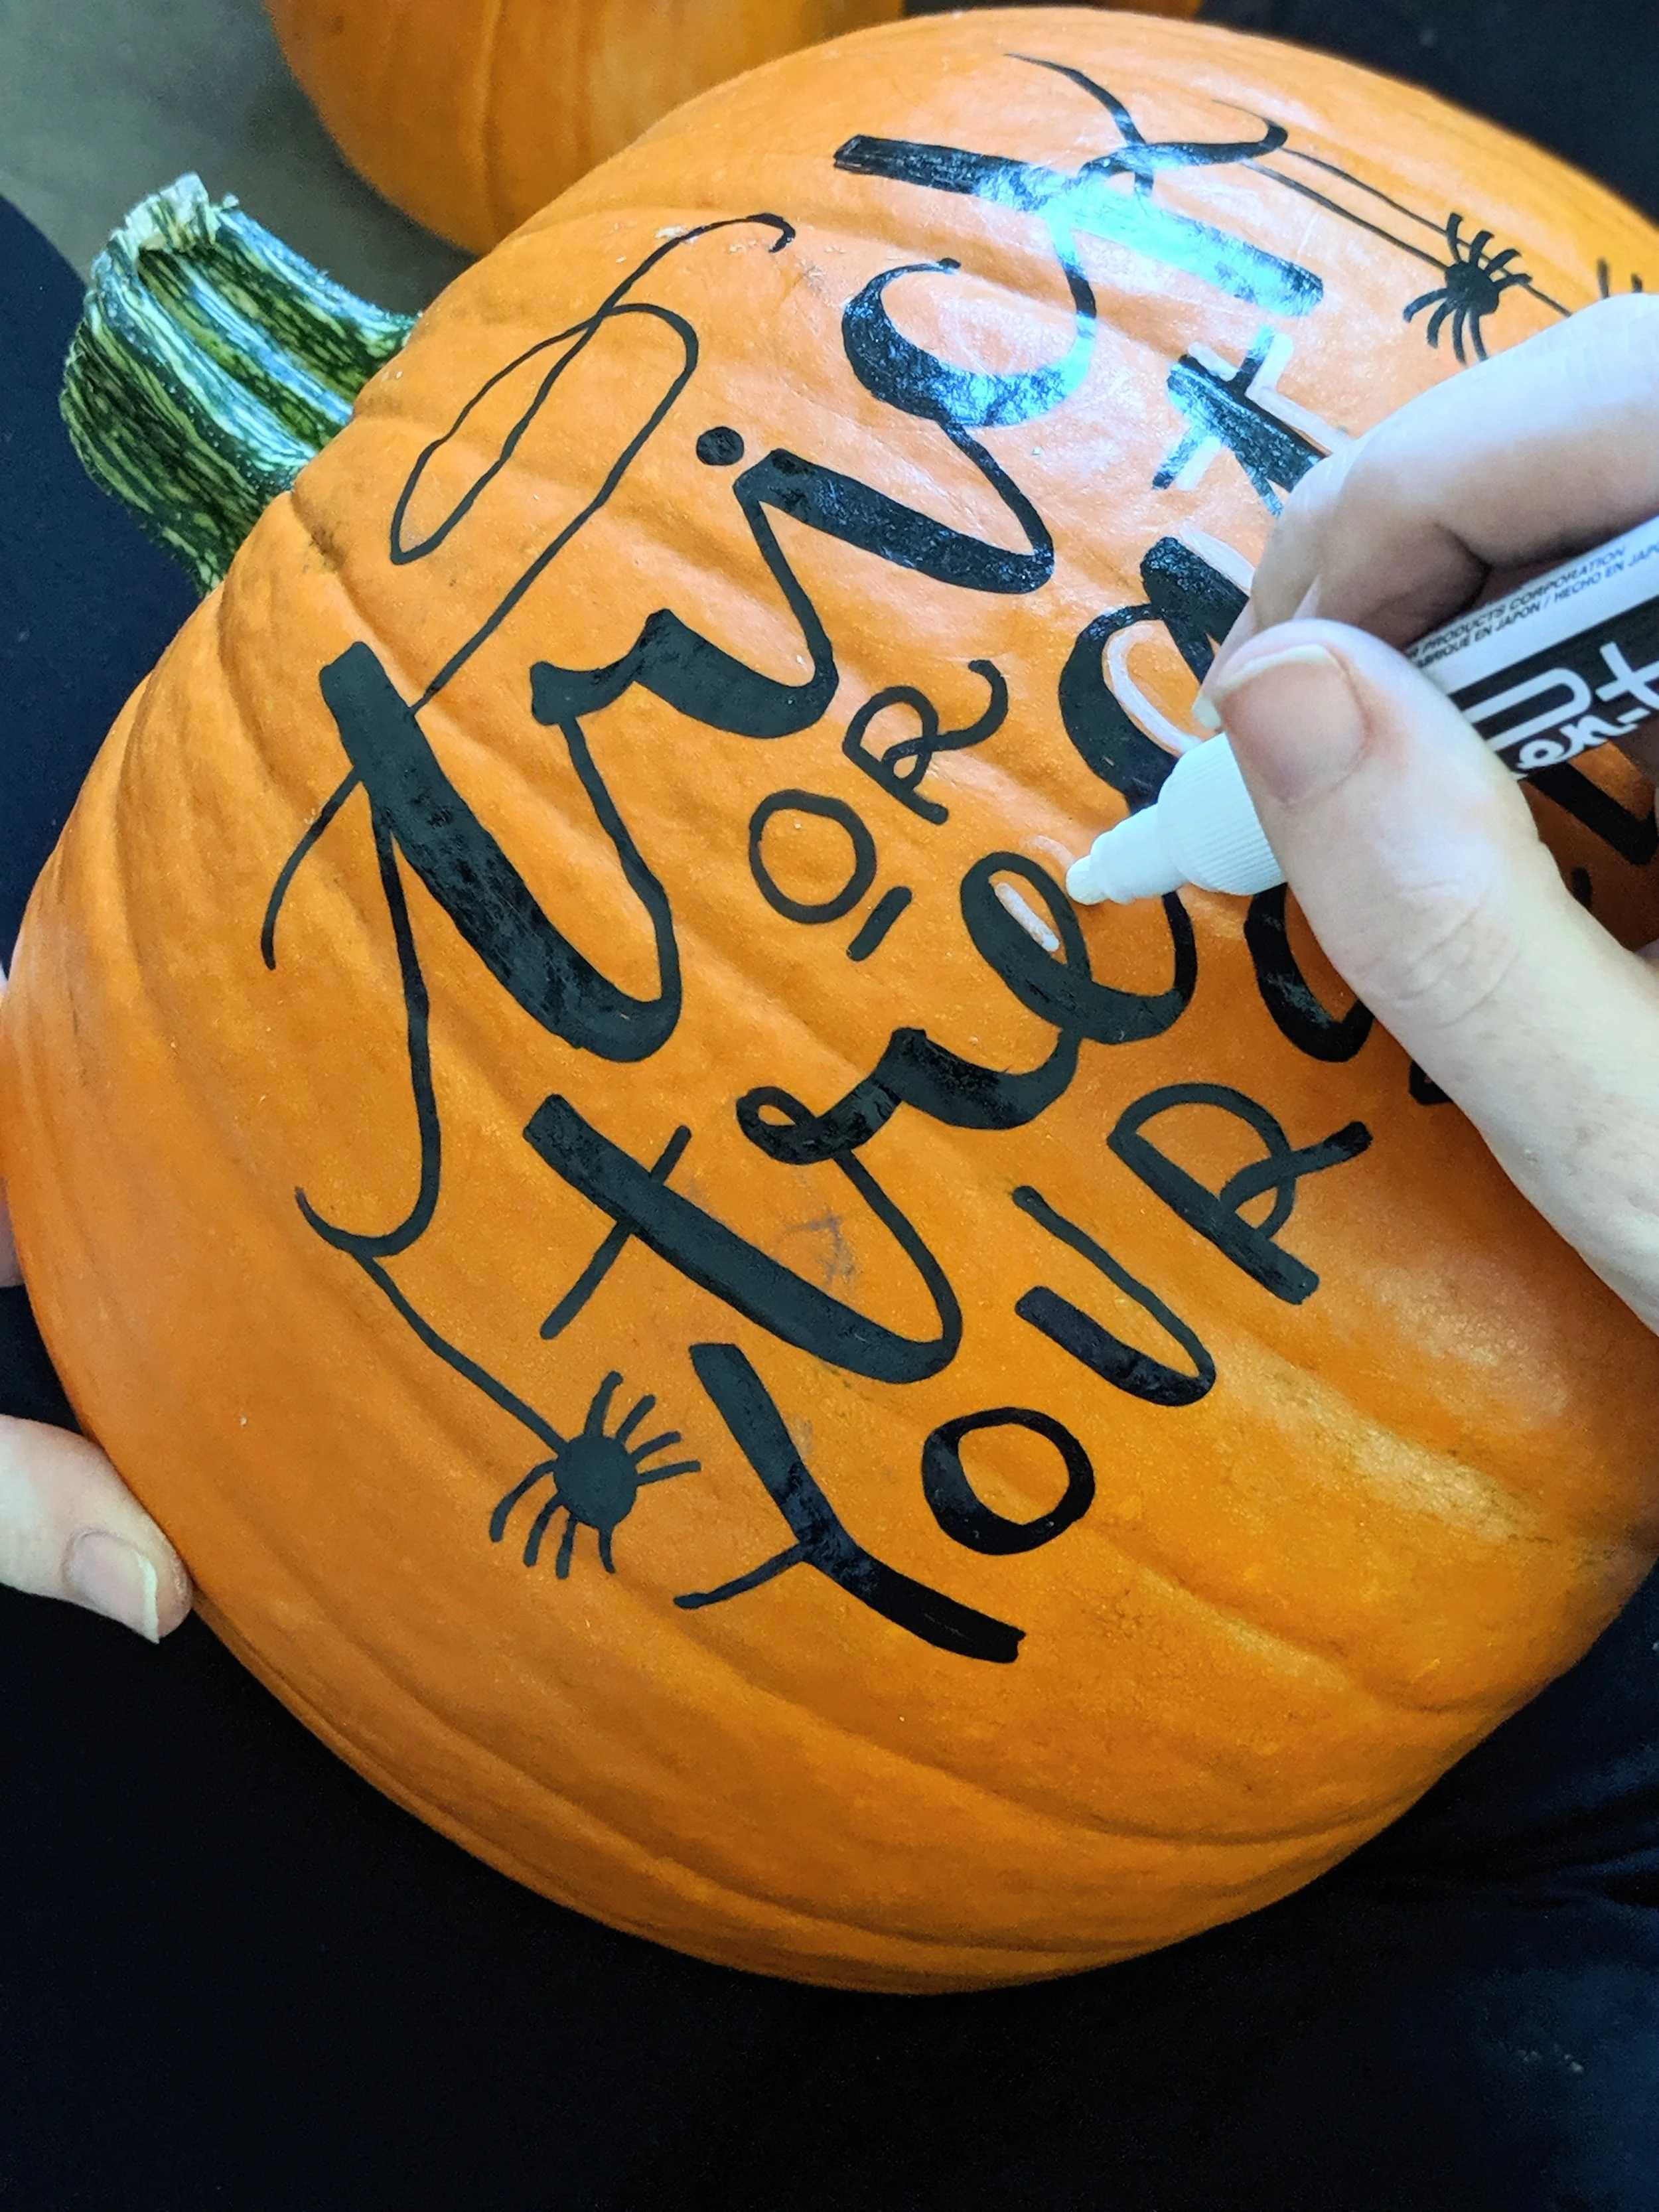
Tip #2: Slow down. This isn’t the time to try to break a speed record. Take this process of tracing over your sketch with the paint pen very slowly. Reducing your speed will help you navigate bumps, as well as the curve of the pumpkin.
Tip# 3: Turn with the curve. And speaking of the pumpkin’s curve, you’re going to want to turn it as you script. When we’re scripting on paper, the movement for our lovely loopy letters comes from our elbow and shoulder, guiding our pen across a flat plane. But when our writing surface is round, we not only have to move our pen left to right, up and down, but also forward in space as the pumpkin’s surface curves away from us. That’s, um, not ideal.
Turning the pumpkin slightly as you script will make it more like writing on a flat surface. The best way to do this is to pause between letters and turn the pumpkin as you go. But if you don’t have an opportunity to take a break between letters, (say for example you’re scripting a long swash that curves around the pumpkin), you can turn the pumpkin as you are scripting. To do this, put your non-dominant hand on top of the pumpkin and turn it slowly and ever-so-slightly in the direction OPPOSITE the direction you’re moving your pen. While you’re doing this, you should try to maintain contact with the pen and the pumpkin so as not to create a break in your line. Once it’s been turned, you can continue on. Confused? You can see me in action in the video below. See how I turn the pumpkin as I’m scripting?
Step 4: Admire & Share
Stand back and look at your spooky creation — well done, you! If you’ve used a permanent paint pen, pop your new work of art on your porch. As long as Billy Corgan** doesn’t live in your neighborhood, it should easily make it on your stoop through Halloween.
Once you have it arranged just so, snap a pic and post it on the ‘gram with #hooplahalloween (remember, if your account is private, you’ll need to tag me in it as well). I cannot WAIT to see what you come up with!
BONUS: A Template
If you want a little bit of a head start with your pumpkin, you can download the Hocus Pocus template for free - for realsies! Click the button below to download. If your pumpkin is larger or smaller than the template, no problem. When you print, you should be given an option to customize the print scale - you can adjust the percentage accordingly.
Until then… happy scripting, witches!
** Please tell me you get this reference. No? Are you saying I’m old?! Whatever, I’m gonna go put on my flannel and listen to Melon Collie & the Infinite Sadness and forget about it.