
TUTORIAL: Manage Your Crazy Schedules with the Family Command Center Chalkboard
Back to school season is always a really fun time for kids. School supply shopping, seeing friends after a long summer, meeting new teachers. But this year, it’s going to be… different. Yes, they will still be doing those things, but it will be from a distance. Whether your kids will be going back on a part-time schedule or doing full-time e-learning, school is going to look a little different for everyone this year.
And as intimidating as it is for kids, it can be even more so for parents… especially working parents. To help mitigate some of the stress that comes with balance your children’s schooling ON TOP of everything else you already do, I’ve pulled together a tutorial for a chalkboard that will help your family keep track of e-learning activities and other appointments – in the simplest way possible. Because let’s face it: this semester is going to be a shit show. We don’t need a complex tracking system – we need something that’s doable, even when we’re operating on 3 hours of sleep and a belly full of rosé.
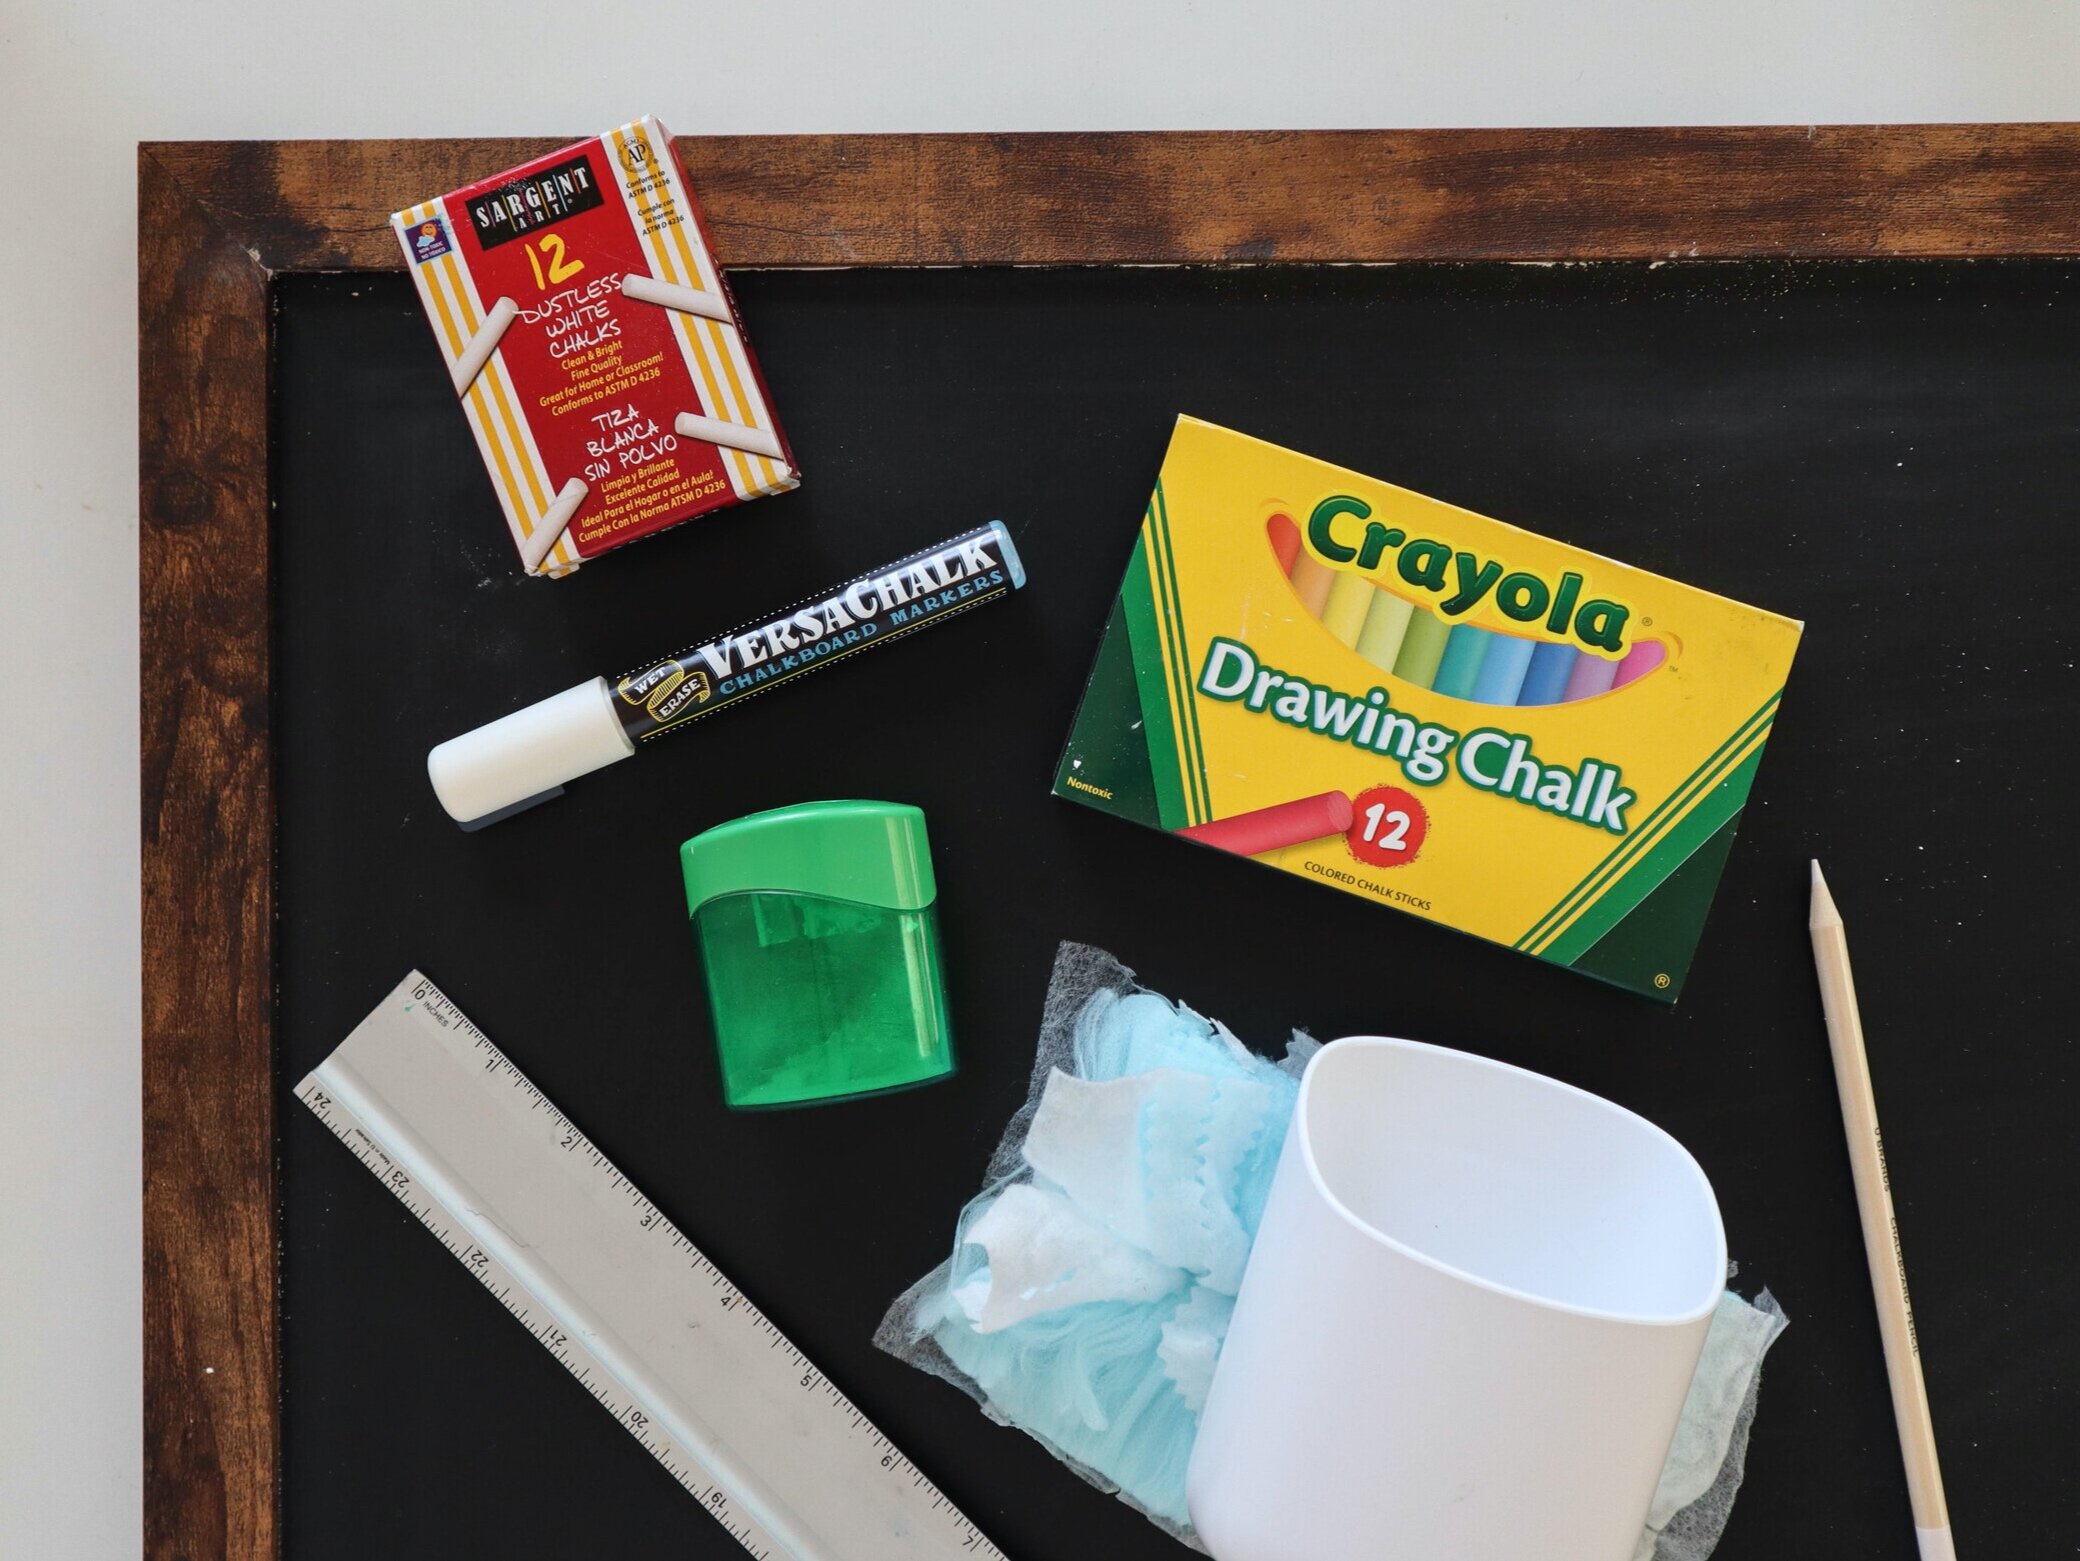
Here’s what you need:
Large, non-porous & magnetic chalkboard. I am using a 24 x 36 Loddie Doddie board, and highly recommend it! It’s easy to hang, non-porous and magnetic, which is pretty much everything you need. And bonus? When this mess is over (and it WILL be over), you can get rid of the e-learning bit and transform it into anything you want. Like a shrine to coffee or a list of all the places you’re going to visit.
A chalk marker
Regular chalk in different colors
Swiffer duster refills (trust me on this)
Ruler
OPTIONAL: Chalk pencil, for sketching
OPTIONAL: Magnetic pencil holder
OPTIONAL: Large-opening pencil sharpener. This will give your regular chalk a finer point, which makes for a prettier list, if you’re into that sort of thing (and you’re here, so I assume you are)
Now remember, EASY is the name of the game here. We aren’t trying to schedule every hour of every day. Instead, we are trying to create an at-a-glance look at the week ahead. If you WANT to make this a bit more detailed by adding in blocks for time or creating some elaborate illustrations, you totally can! But if you just want something to keep your head above water, then you can follow this tutorial to a tee. Let’s dive in.
Step 1: Season your chalkboard.
This is a quick, but necessary step to take before you write on the board. Using the side of a piece of regular chalk, cover the entire board in chalk. This is definitely easier to do before you hang it up. Once it’s covered in chalk, you can erase the “seasoning” with a rag or your Swiffer duster. This prevents your chalk from leaving marks or ghosting on the board. Like I said – quick, but necessary.

Step 2: Create your sections.
We want this board to give us a literal at-a-glance look at our week, and that’s easiest when we divide our board into sections. I divided my board into 3 main sections:
Board header
Days of the week
Space for a weekly quote notes, reminders, photos, permission slips, etc. – we’ll call this the "free space”
Now, we have to do a little math, but I promise it’s not too difficult. First, we want to create a border of space along the edges of our board. Measure a half-inch from the edge all the way around, marking with regular chalk. Using a ruler, connect the marks with regular chalk so you now have a border around the edge of your board.

Next, we want to divide the remaining space into 7 equal columns. Here is the formula you need to follow:
(board width – 1 in) / 7 = column width
Now if that number is super inconvenient to measure with a million decimal points, just round up or down to the nearest measurable point – I usually stick with quarter inches to make things easier. That will mean your last column – your free space – will be slightly smaller or larger than the columns for your days of the week, but that’s okay. Once you have determined the width of your columns, use a ruler to draw them onto the board with regular chalk.
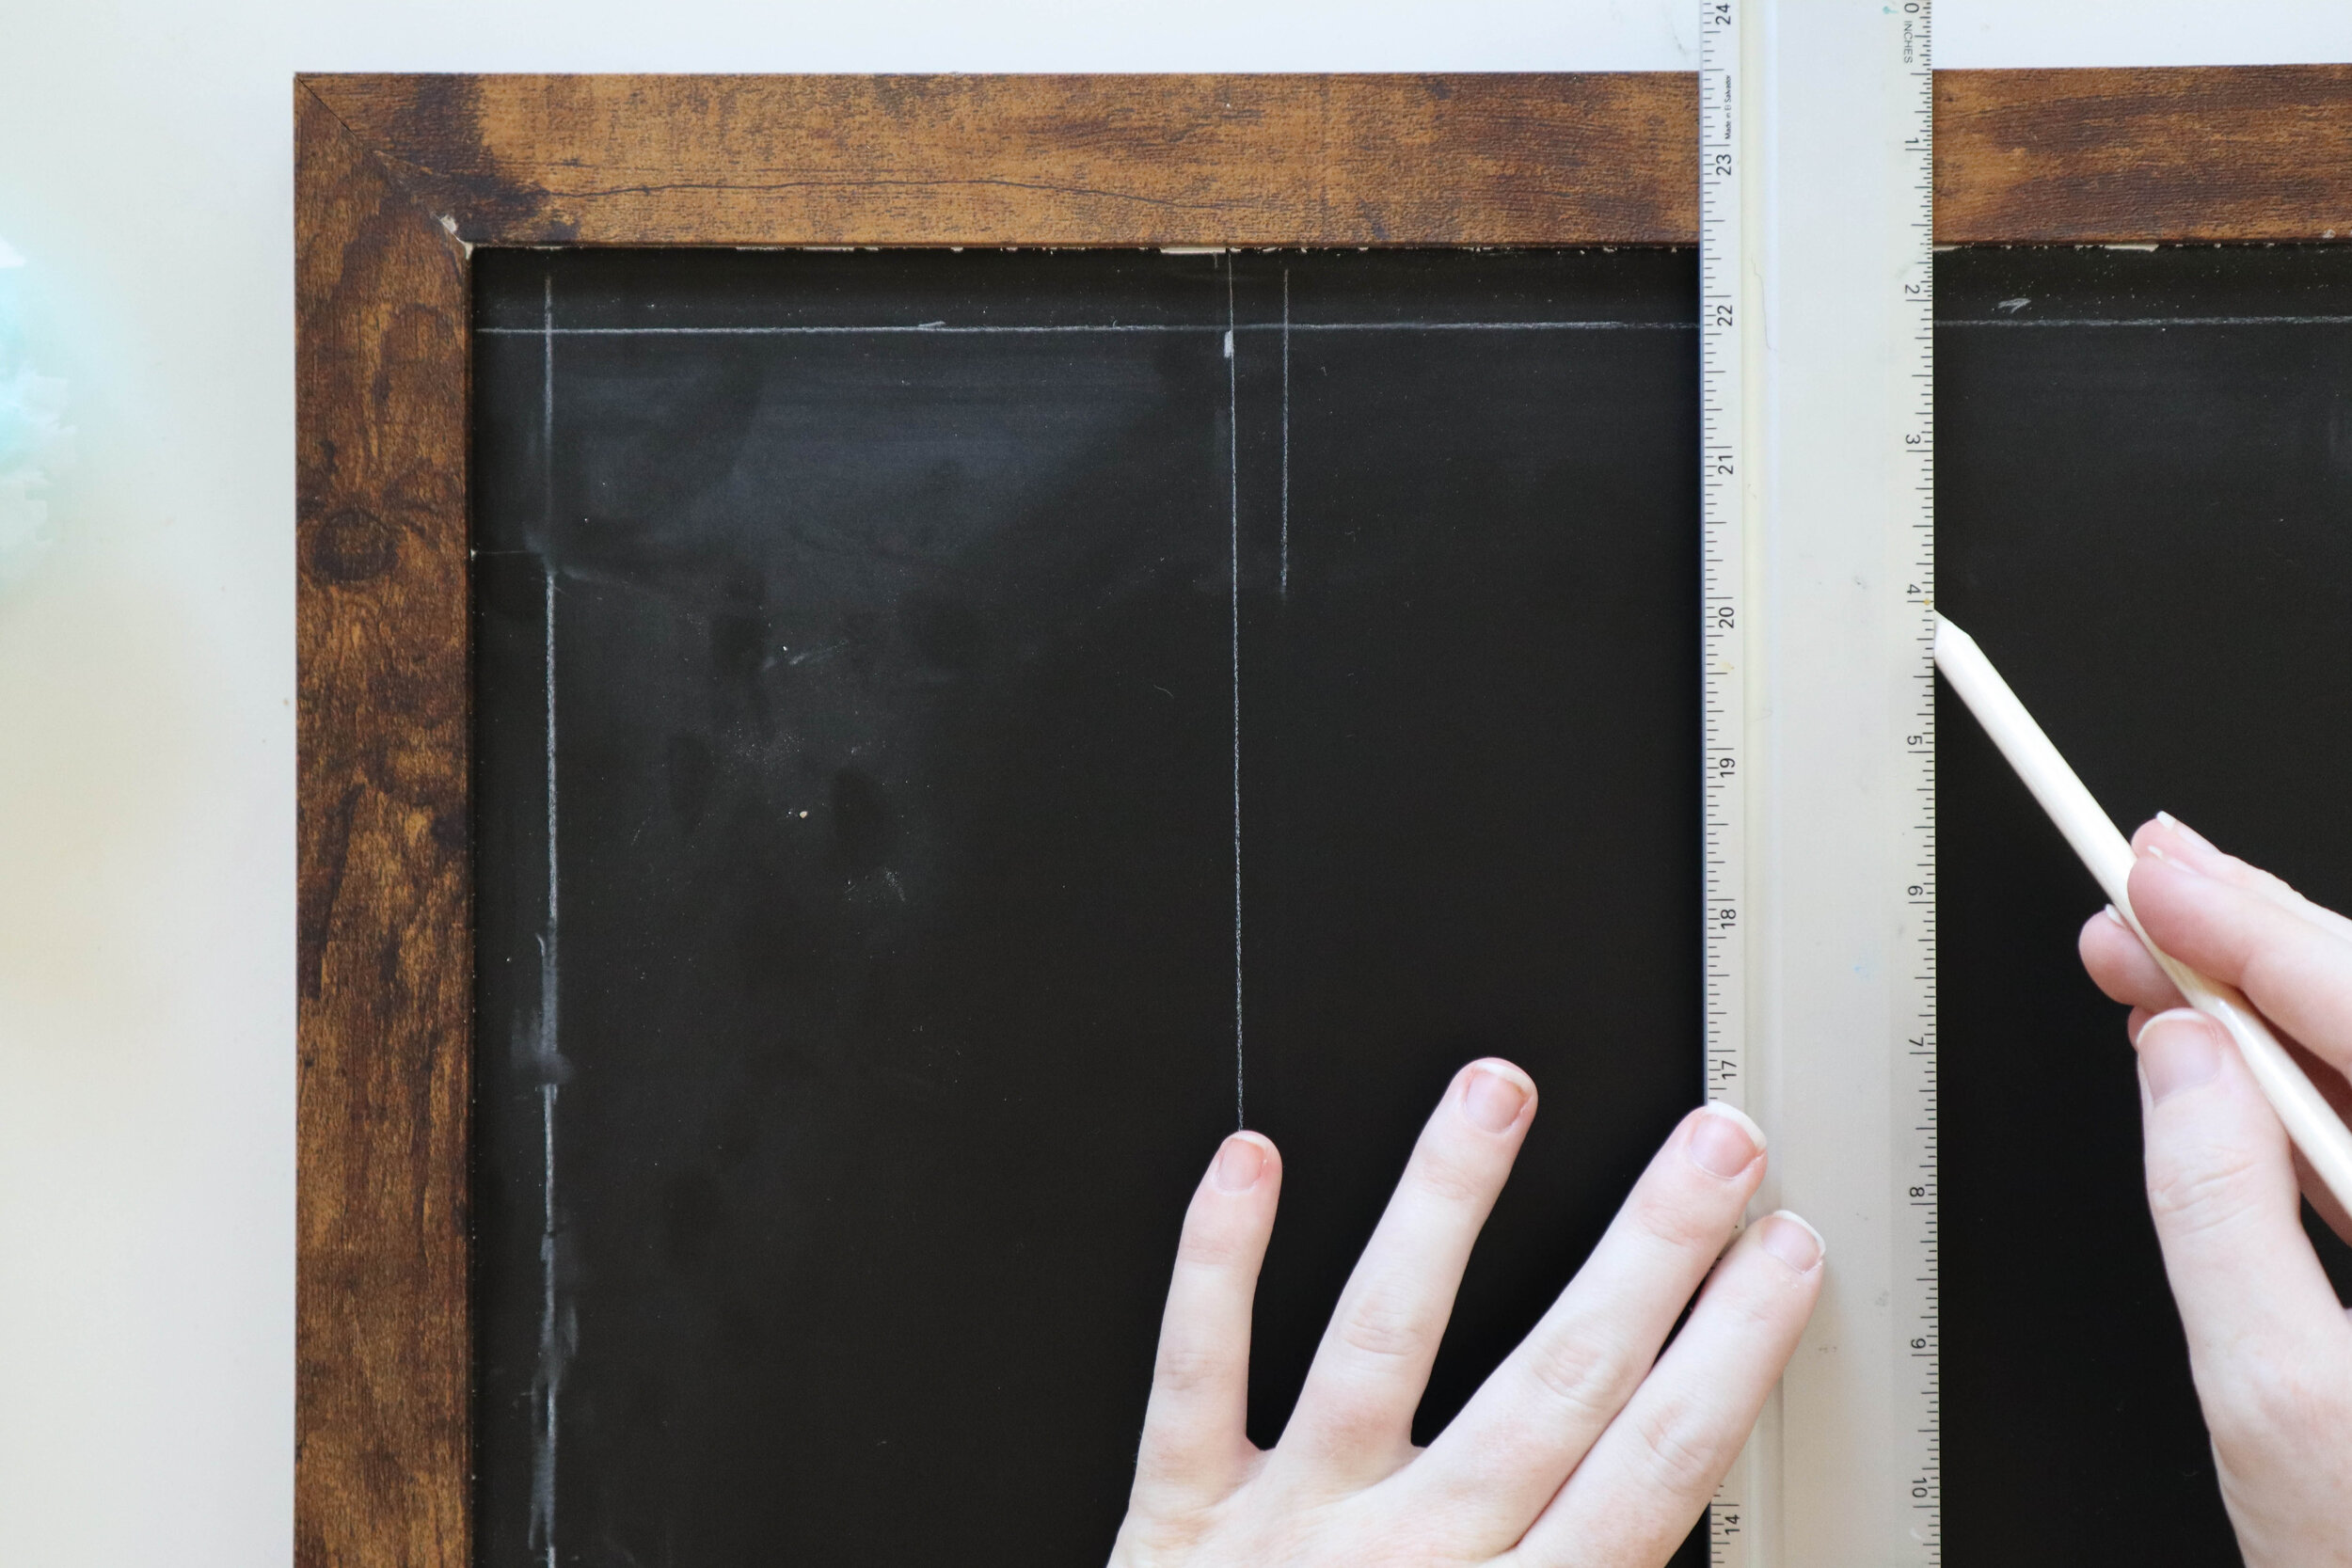
Now it’s time to mark off some space for your main header. This is really going to be a personal preference. I knew I wanted to add a weekly quote at the top of my board, so I made my main header 4 inches tall.
Next, let’s divide up our columns. The first 5 columns are going to be weekdays. I want those to have as much space as possible, so I’m going to leave them alone. Column number 6 will be for the weekend when no homework is due and appointments are at a minimum, so I’m going to divide this column in half – Saturday gets the top and Sunday gets the bottom.
Our last column, the free space, can be divided however you want. I’m going to use this space to add notes throughout the week. In my Notes section, I marked off a little space to place my magnetic pencil holder, which is where my chalk will go – I am pretty famous for my ability to leave pens and chalk all over the house, so hopefully this will reign me in. If you would like your kids to use the board on their own, having a designated space for the chalk is crucial.
Remember, this free space can be for whatever you want! Maybe it’s a spot to hang coupons and make a grocery list, or perhaps you want to use it to leave words of encouragement to your kiddos and significant other. It’s your space that you can tailor to your family’s needs.
Step 3: Add your headers & sub-headers
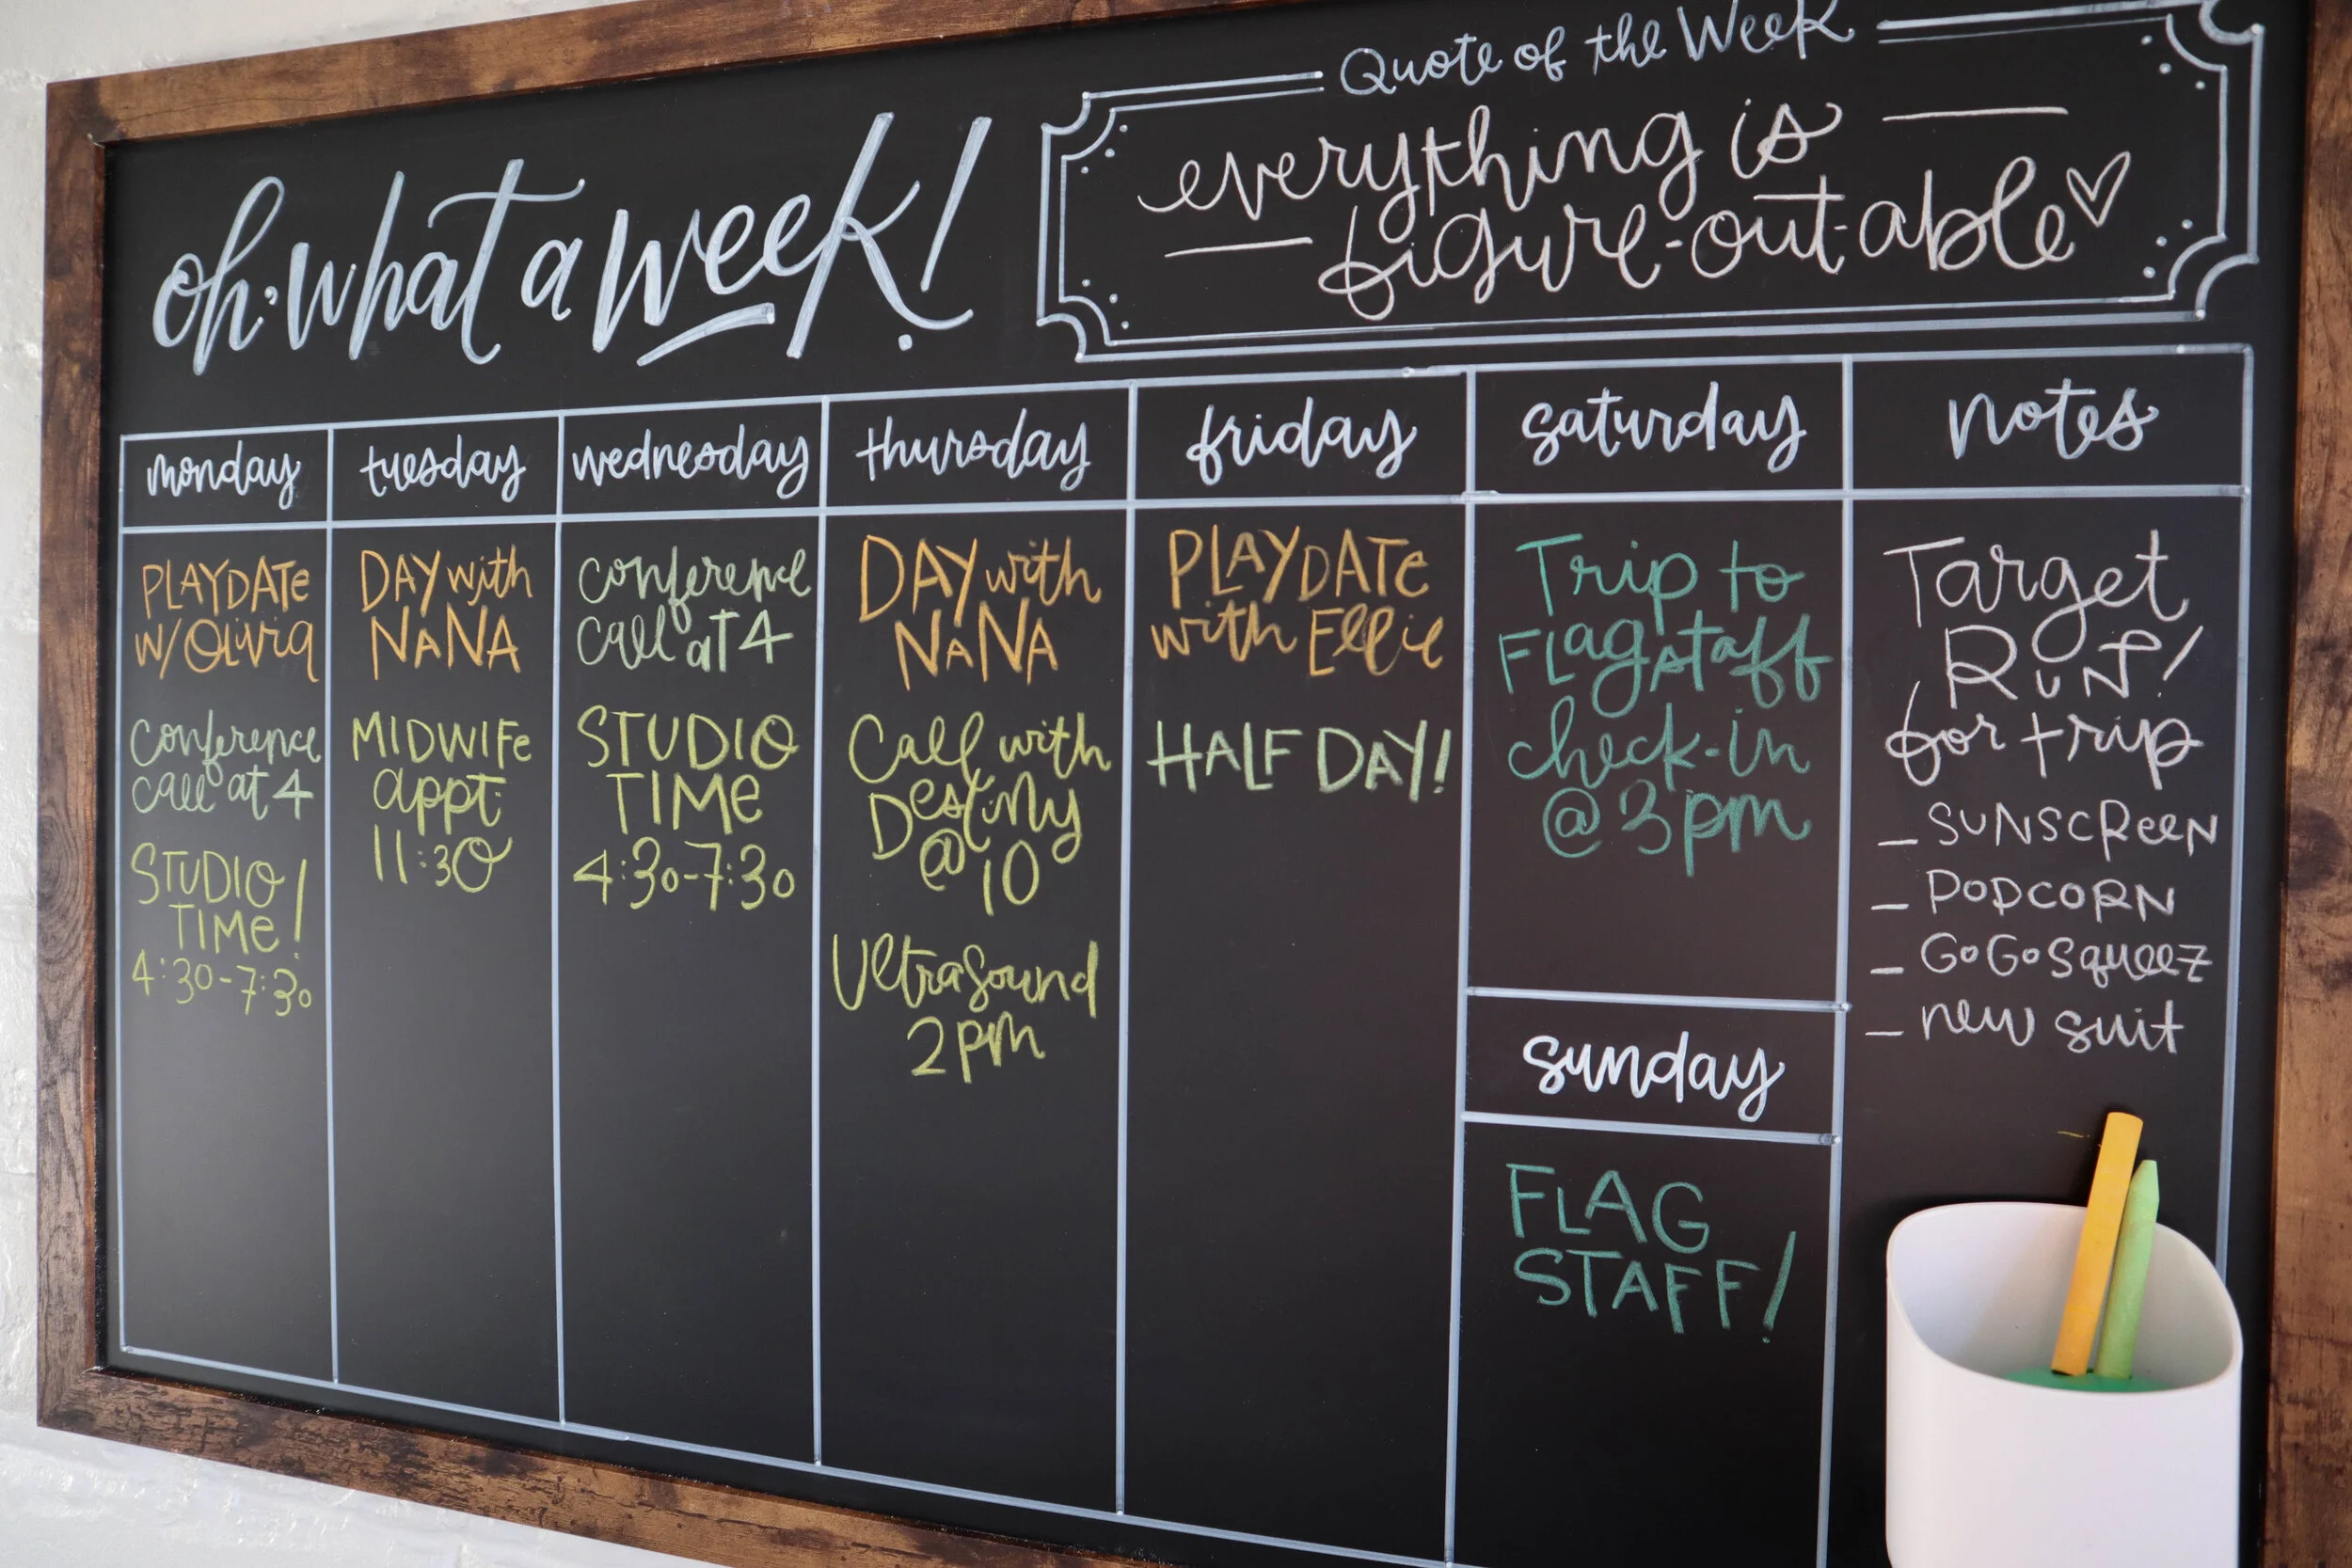
Using your regular chalk, script in the headers and sub-headers for your board. Essentially, you want a main title for your board, as well as sub-headings on each column noting the days of the week. You can see how I labeled mine in the following photo. While our lists will be removed every week, our headers are going to stay put, so this is a good opportunity to whip out some calligraphy or fun lettering. You’re going to be looking at this board quite a bit, so might as well make it pretty!
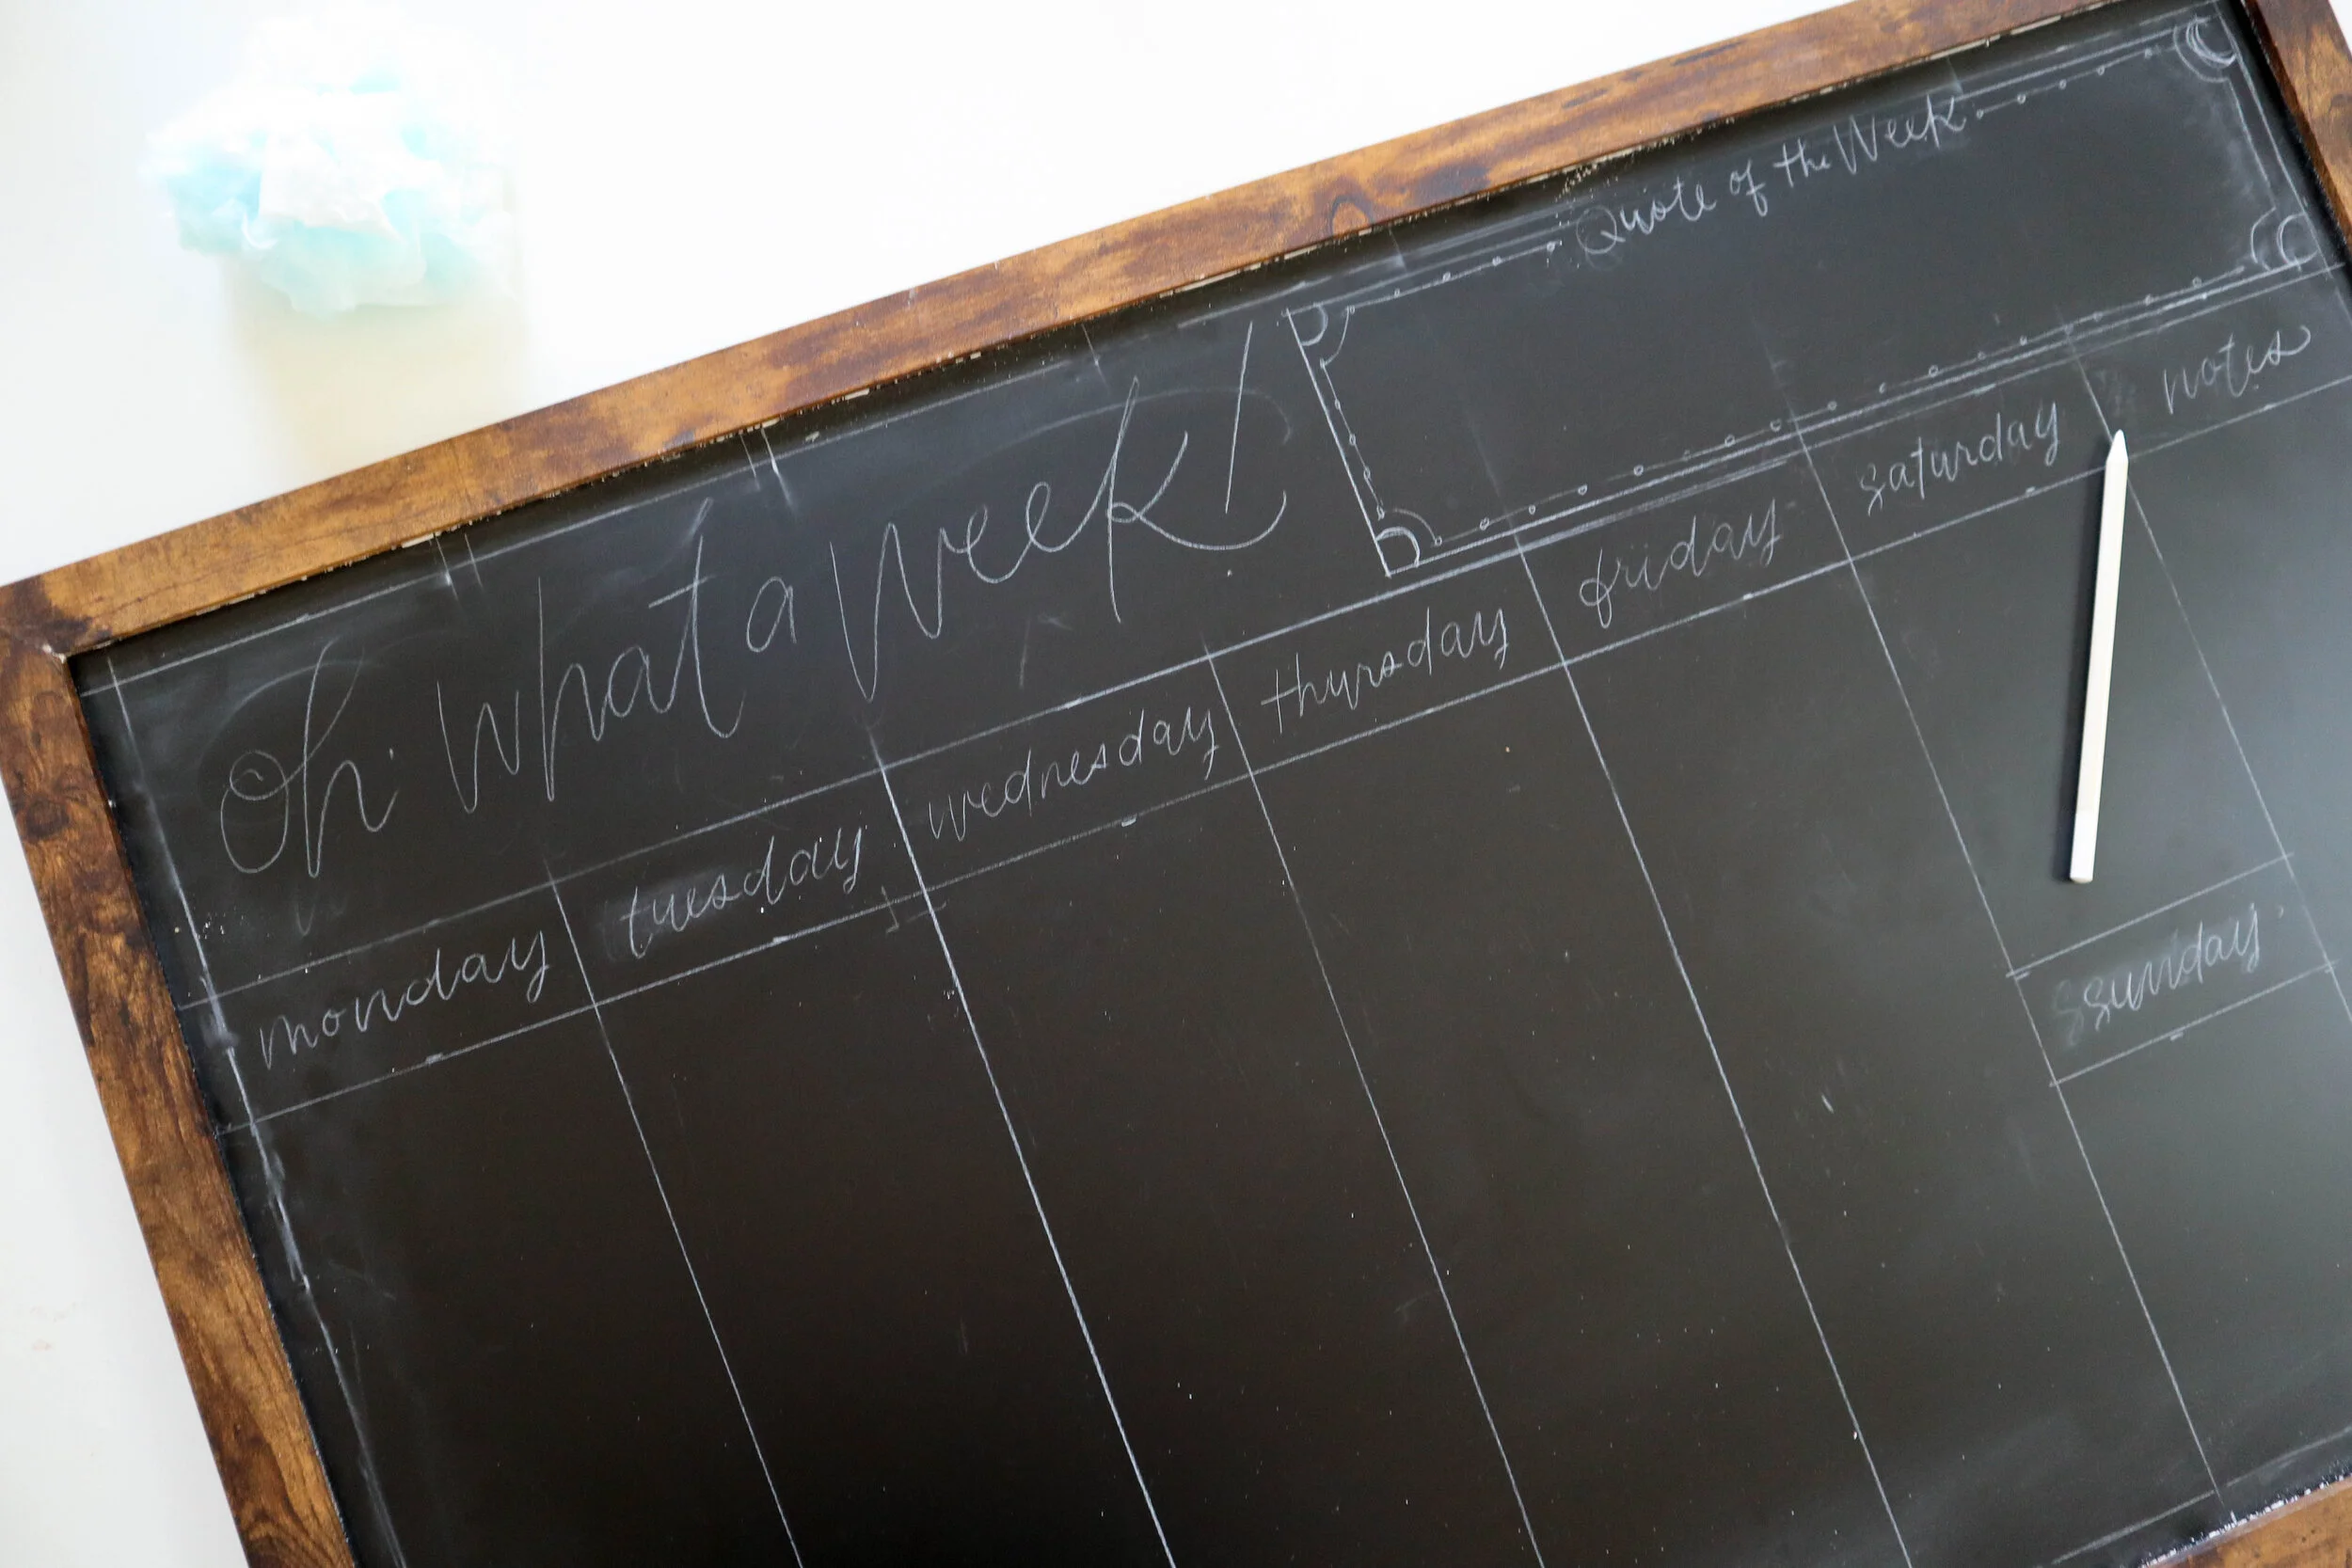
Step 4: Trace with chalk marker.
Now that we have everything laid out just as we want it in chalk, it’s time to make it semi-permanent by tracing with a chalk marker. I used VersaChalk Bold Tip chalk markers, which are my go-to. I opted to keep everything in white, but they have OODLES of colors to choose from, including metallic markers.
I started by tracing the border, as well as the column outlines. I highly recommend using a ruler for this portion – will make your life WAY easier. I then added in the header, sub-headings and illustrations. One note about tracing: depending on how much chalk dust is on your board, you may need to scribble your marker on a clean piece of paper every now and then to remove excess dust from your marker.
Once everything is dry, I used my Swiffer Duster refill to remove all the excess chalk dust from the board. Sure, you can use a soft cloth to do this, but in my experience, even the softest cloth can sometimes scratch the marker – the Swiffer duster will not. After all the excess chalk is removed, you can go back and tweak the design as needed. If you’ve made a big error and need to erase some of the marker, no worries – so long as your board is non-porous, you’ll be able to remove the marker with a bit of water.
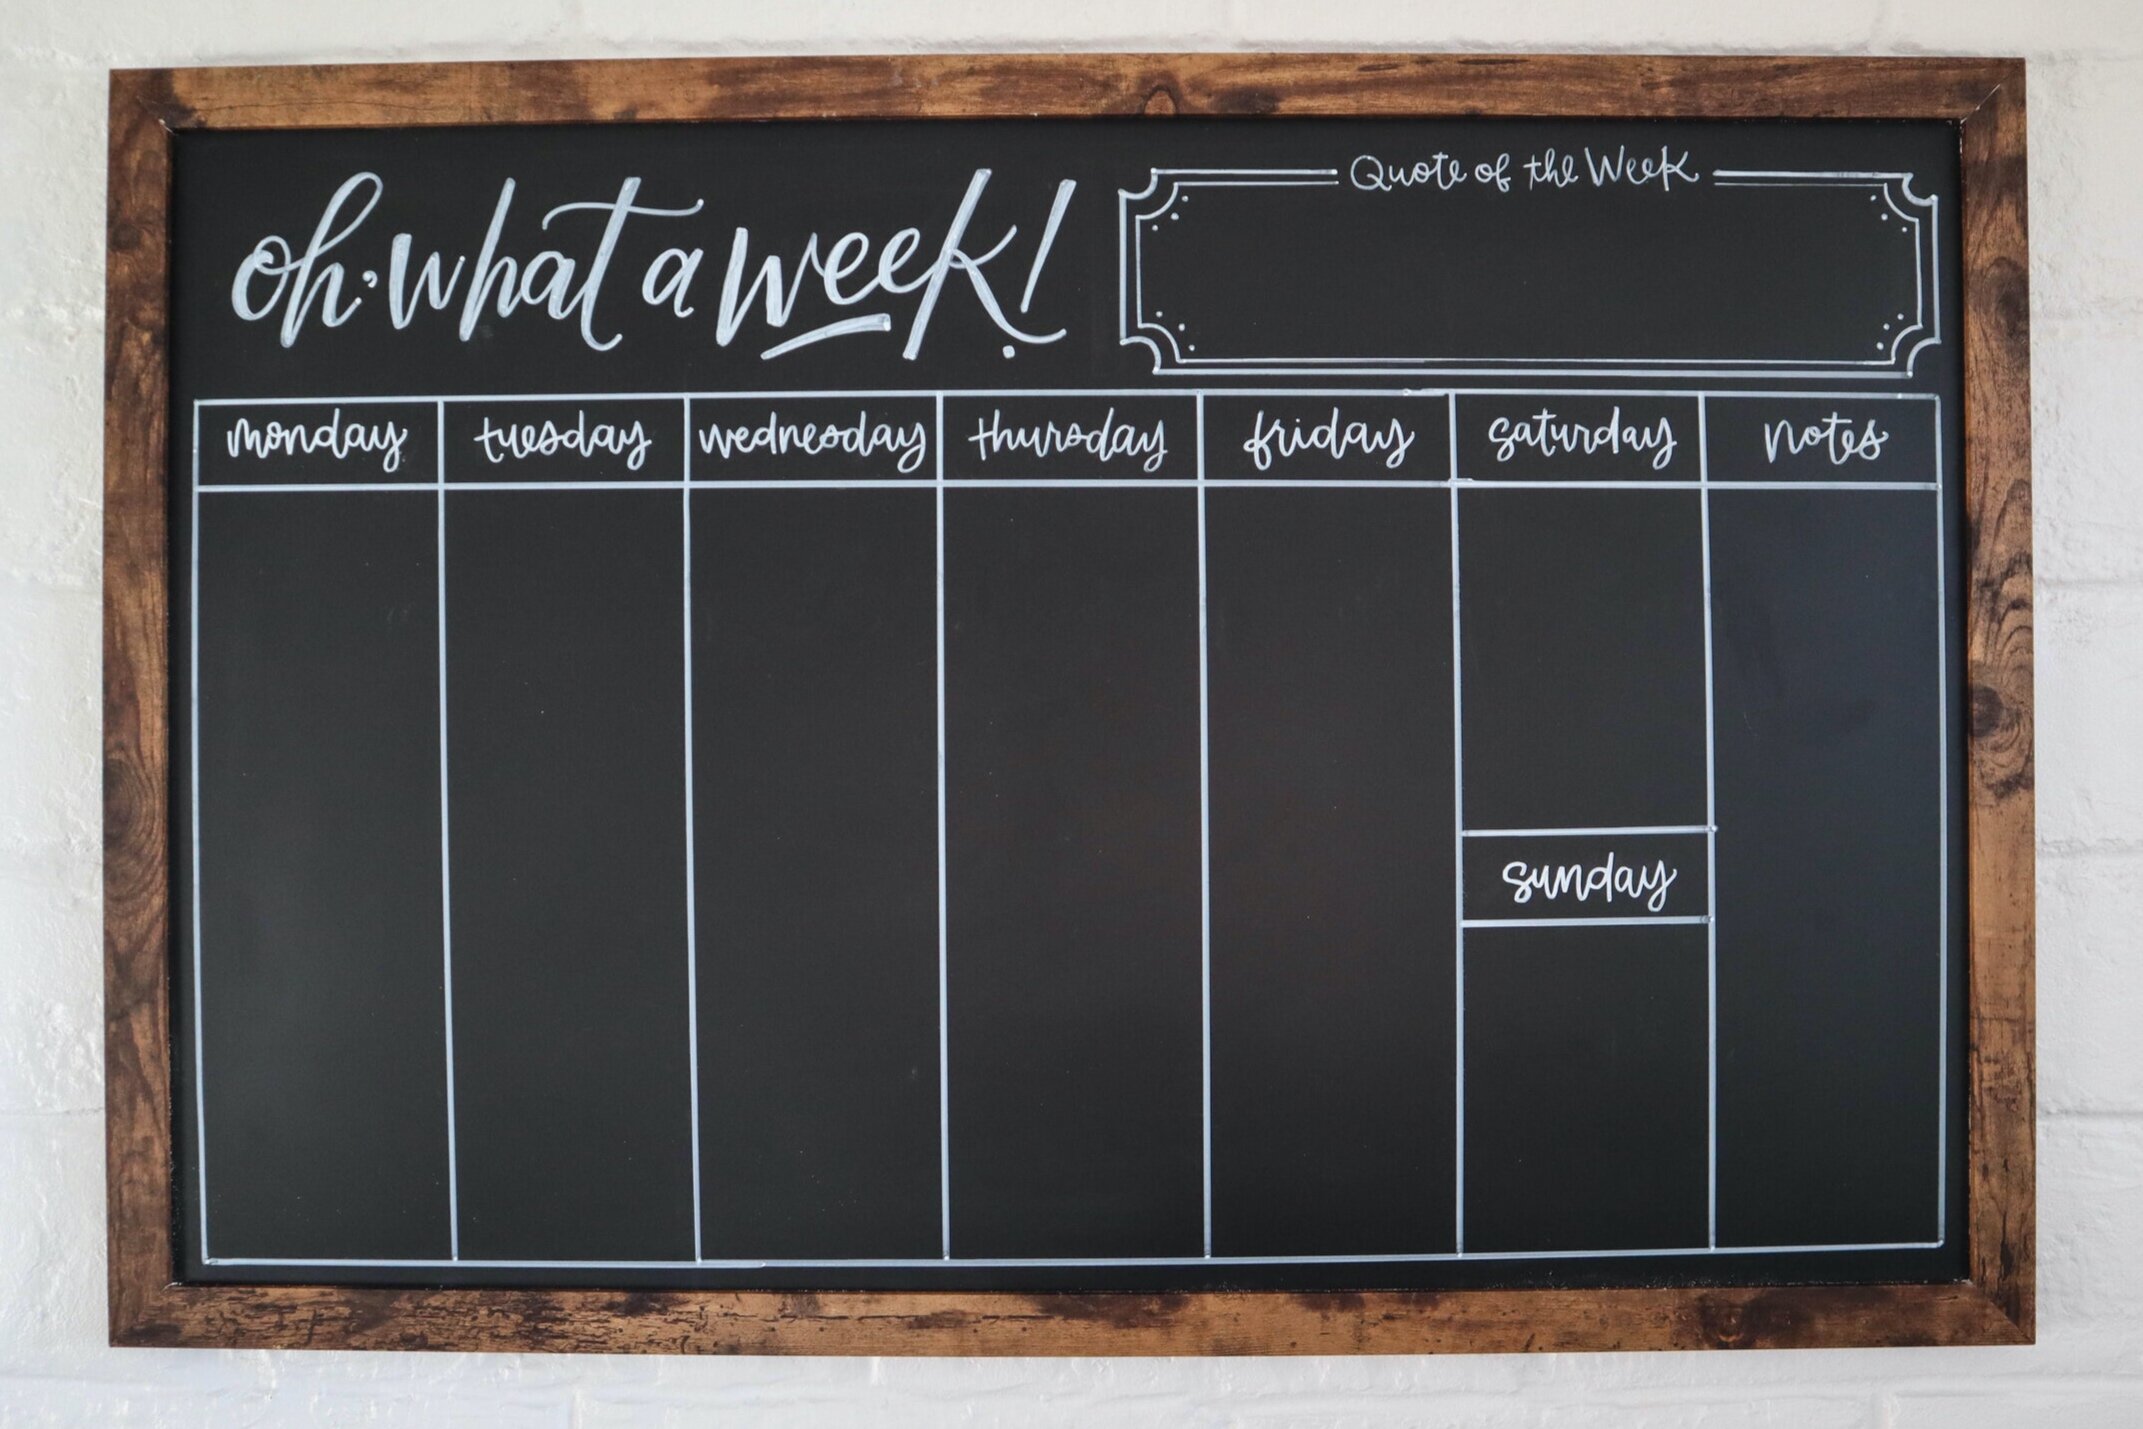
Step 5: Create & implement your tracking system.
You now have the bones of your board completed – well done, you! The final step is to create a system to track those things you need to track. Now when I say “system,” please don’t seize up in terror. We aren’t going to do anything complicated – remember, our whole goal here is to outline your week in a single glance. There are no spreadsheets, no time tables, no elaborate index key of codes. Instead, we’re going to use different colors of chalk to make note of different kinds of tasks/appointments.
Let’s walk through how this could work for e-learning.
Green tasks are the classes that need to be taken that day.
Blue tasks are homework assignments.
Purple tasks are homework due dates.
Red tasks are exams.
Sure, you can write these all out in one color. But by color coding them, you can take a quick glance at the board and scan for purple tasks (homework due dates) and say, “Hey, Johnny, your spelling homework is due tomorrow. Turn off the YouTubes.” The goal is to have these tasks written out by Sunday evening so you don’t have to worry about it during the week. For younger children, schools will often send out a weekly e-learning schedule, making this step much easier. If not, have a 5-minute recap at the end of the day and you and your child can update the board together.
This is just one way to use color-coding in your e-learning. If you have more than one child in e-learning, you can color code the tasks based on which kid they belong to. You and your significant other can also have your own colors to add your appointments/designated scream-into-a-pillow time to the board. If your child prefers to handle the scheduling themselves, they could color code based on subject. It is really customizable to what you need.
At the end of the week, use your Swiffer to dust the board clean, and start over again. Maybe have a glass of wine. You deserve it.
When all of this ends – and it WILL (I mean, it has to… right?!) – you can use the board to track after school activities, field trips, business trips, doctors’ appointments and the like. Consider this board your family’s command center. Personally, my daughter isn’t old enough to be in school, so we are lucky to avoid this whole e-learning mess. But, with childcare being a rare commodity these days and both my husband and I working from home, we are using our family board to note when Wren will be at a family member’s home, when I have OB appointments (and since my due date is right around the corner, there are a LOT of them), and when my husband has to work later hours. This just helps us keep track of who will be on toddler duty and who gets to work. Note how I say “gets to,” because it truly is a luxury these days – can you relate?
If you have any questions about how to create your own Super Easy Family Scheduling Chalkboard, be sure to ask in the comments below. Made your own? I’d love to see it! Be sure to share on the ‘gram and tag @hooplaletters. Until next time, hang in there, letter lovers!